Creating the questionnaire: Get started with e-Survey
HE EASIEST SURVEY PLATFORM
Welcome to this tutorial dedicated to mastering our e-Survey platform. This guide has been designed to help you
step by step navigate the main features, from creating the questionnaire to analyzing the results.
On our platform, every feature has been designed by our Team of specialists to be as user-friendly as possible,
providing you with the best possible experience at every stage of the survey:
- Creating a new survey : design a new questionnaire from a template or start from scratch
- Editing the questionnaire : add questions (16 question types available), then integrate skips and quotas
- Testing the questionnaire : : answer the questionnaire in real conditions and ensure everything works correctly
- Distributing the questionnaire: share the questionnaire with your contacts and/or with the respondent panel
- Tracking response collection : monitor the collection progress and responses in real-time through a dashboard
- Processing and analyzing results : display an overview of the results with graphs, launch analyses, and export all responses in an Excel file

1 - Create a new survey
To create a new survey, start by clicking on the "+ New survey" button (1) from the homepage ("My surveys" page).
You will then access a new page with the details of the new survey to complete:
- Survey title
This is the title that will appear on the platform as well as on the questionnaire (you can choose to hide the title on the questionnaire in the options so that respondents do not see it).
- Ref. / Survey description
This is optional information, visible only to you (and any collaborators who have access to the survey). This information will not be seen by respondents.
- Survey language
This is the language in which you will write the questions. It is also the language in which clarifications and error messages will appear in the questionnaire (e.g., in case of input errors by respondents, failure to follow instructions for a question, etc.).
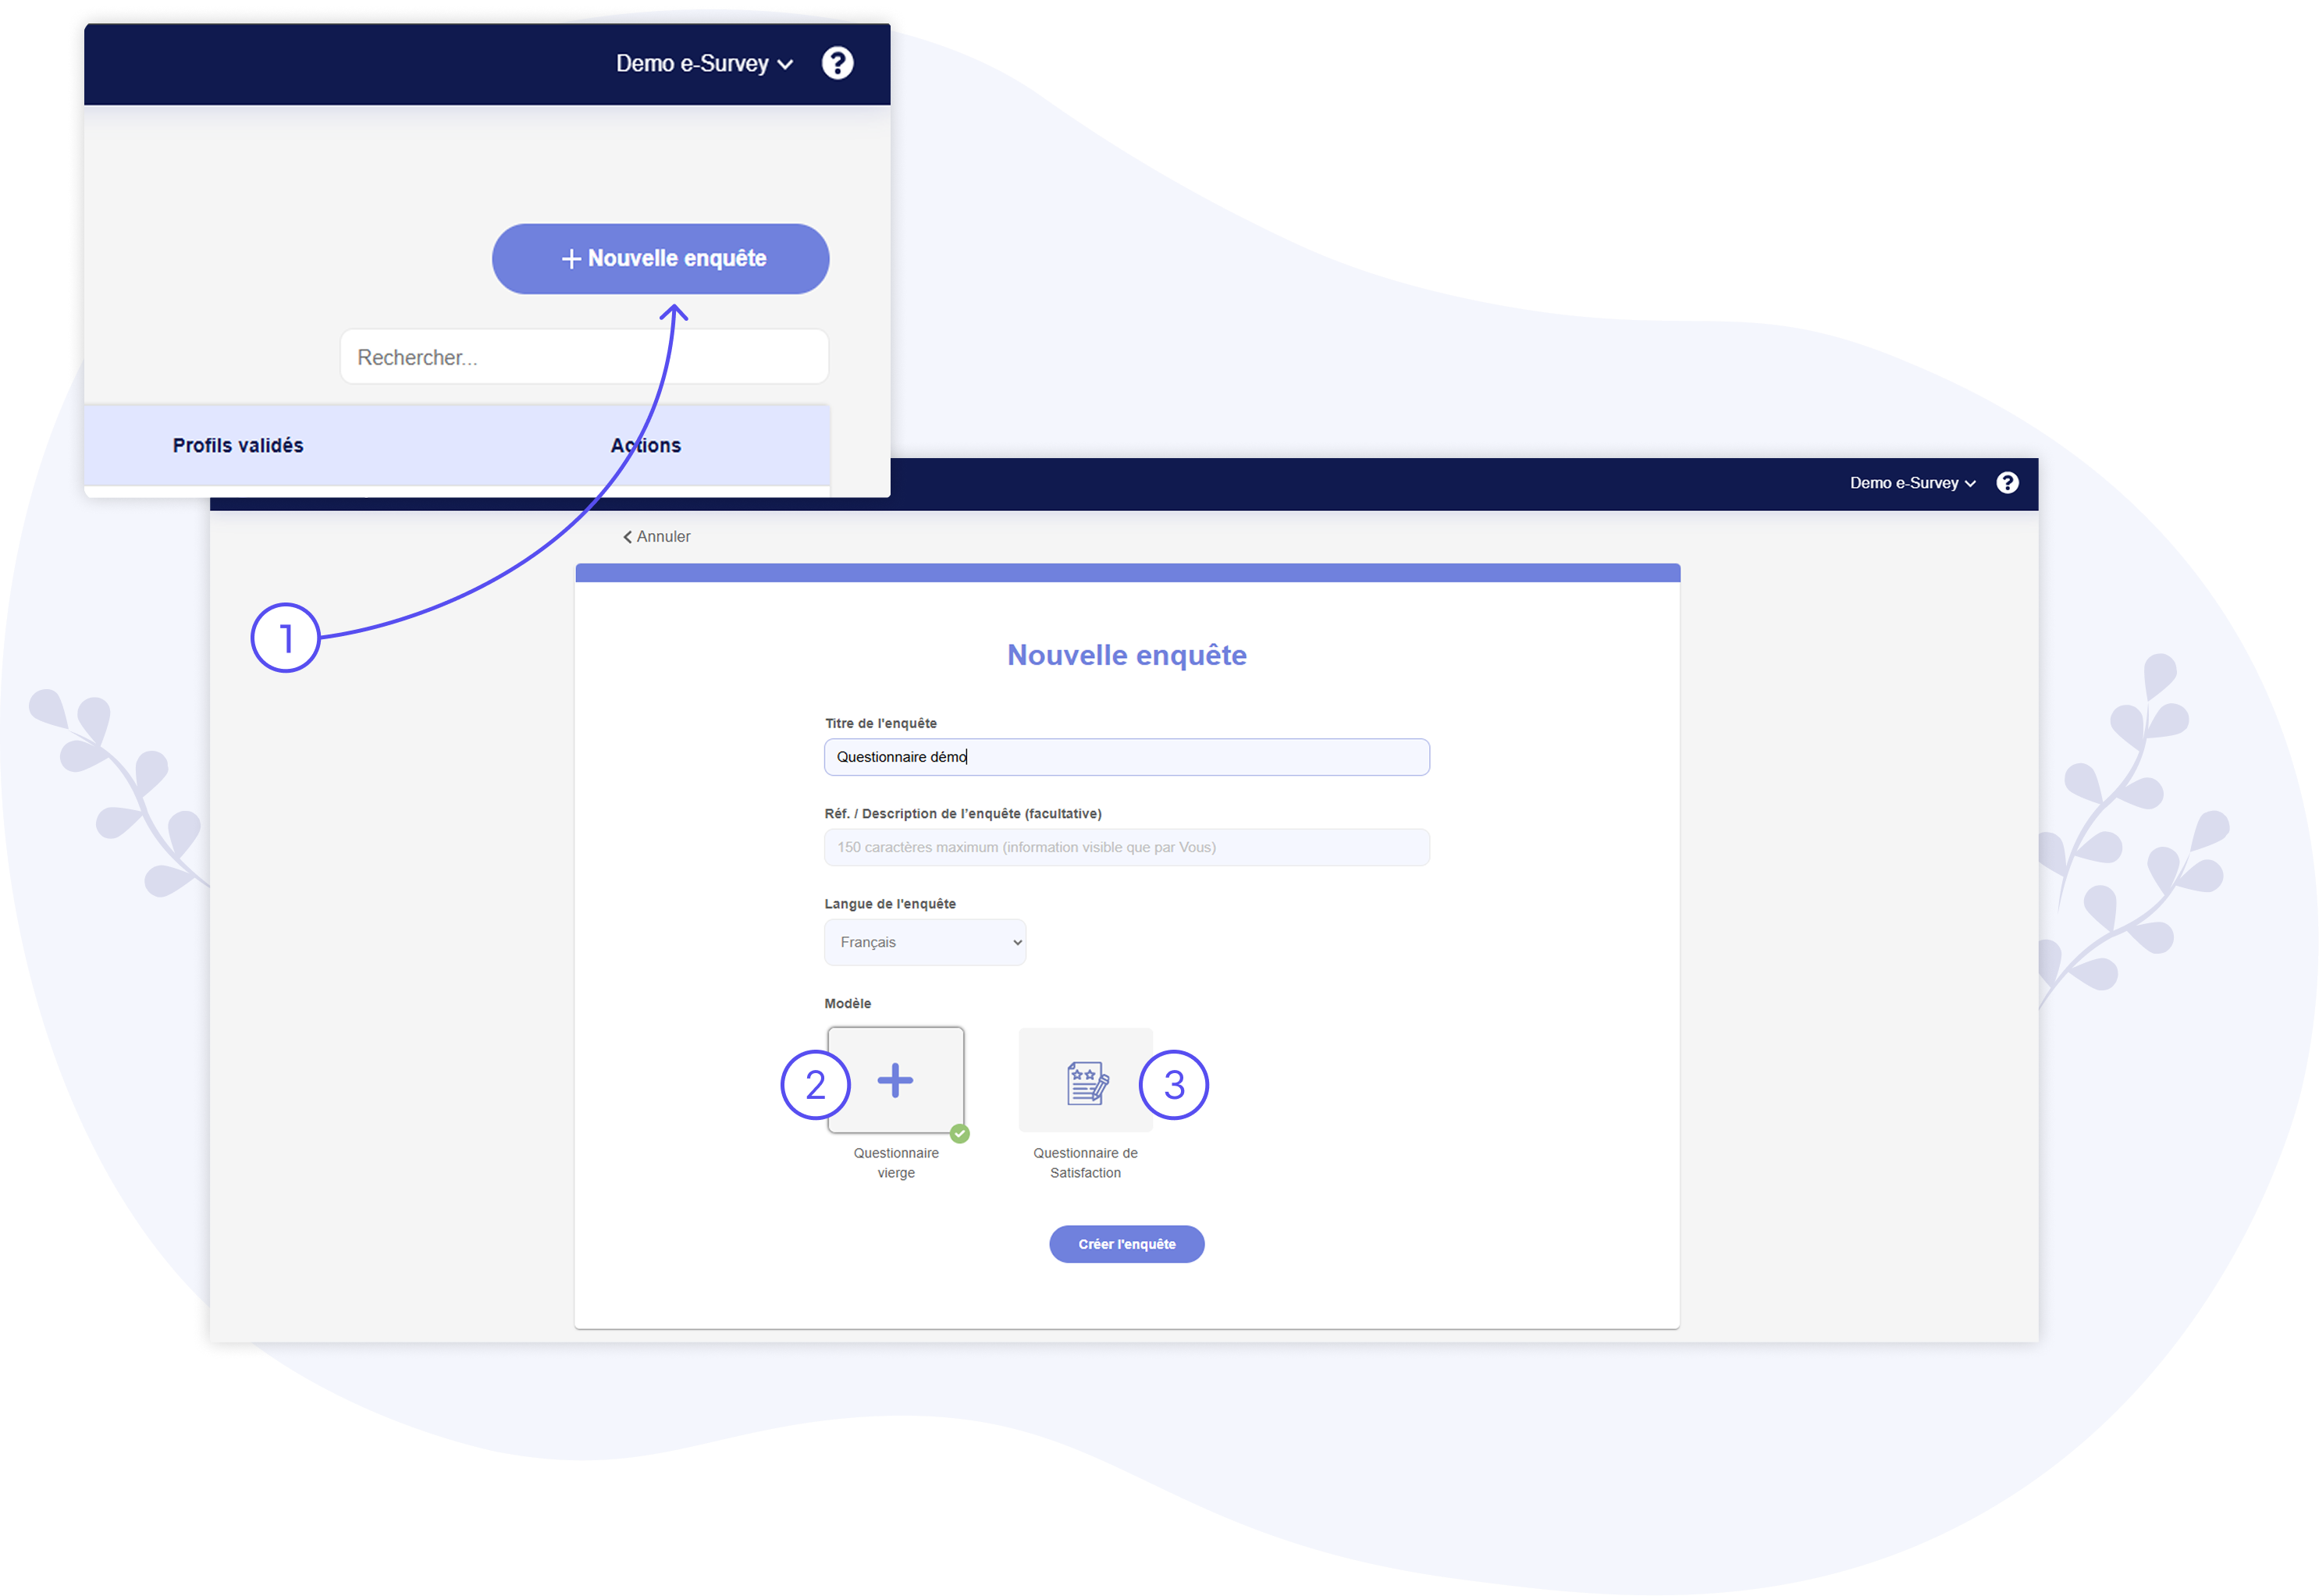
On this same page, you can also choose to:
- Start with a blank questionnaire (2)
You will then need to create the questionnaire from scratch (blank page).
- Or Start with a questionnaire template: the Satisfaction Questionnaire (3)
You will then access a questionnaire template with 10 pre-created questions.
2 – Add questions
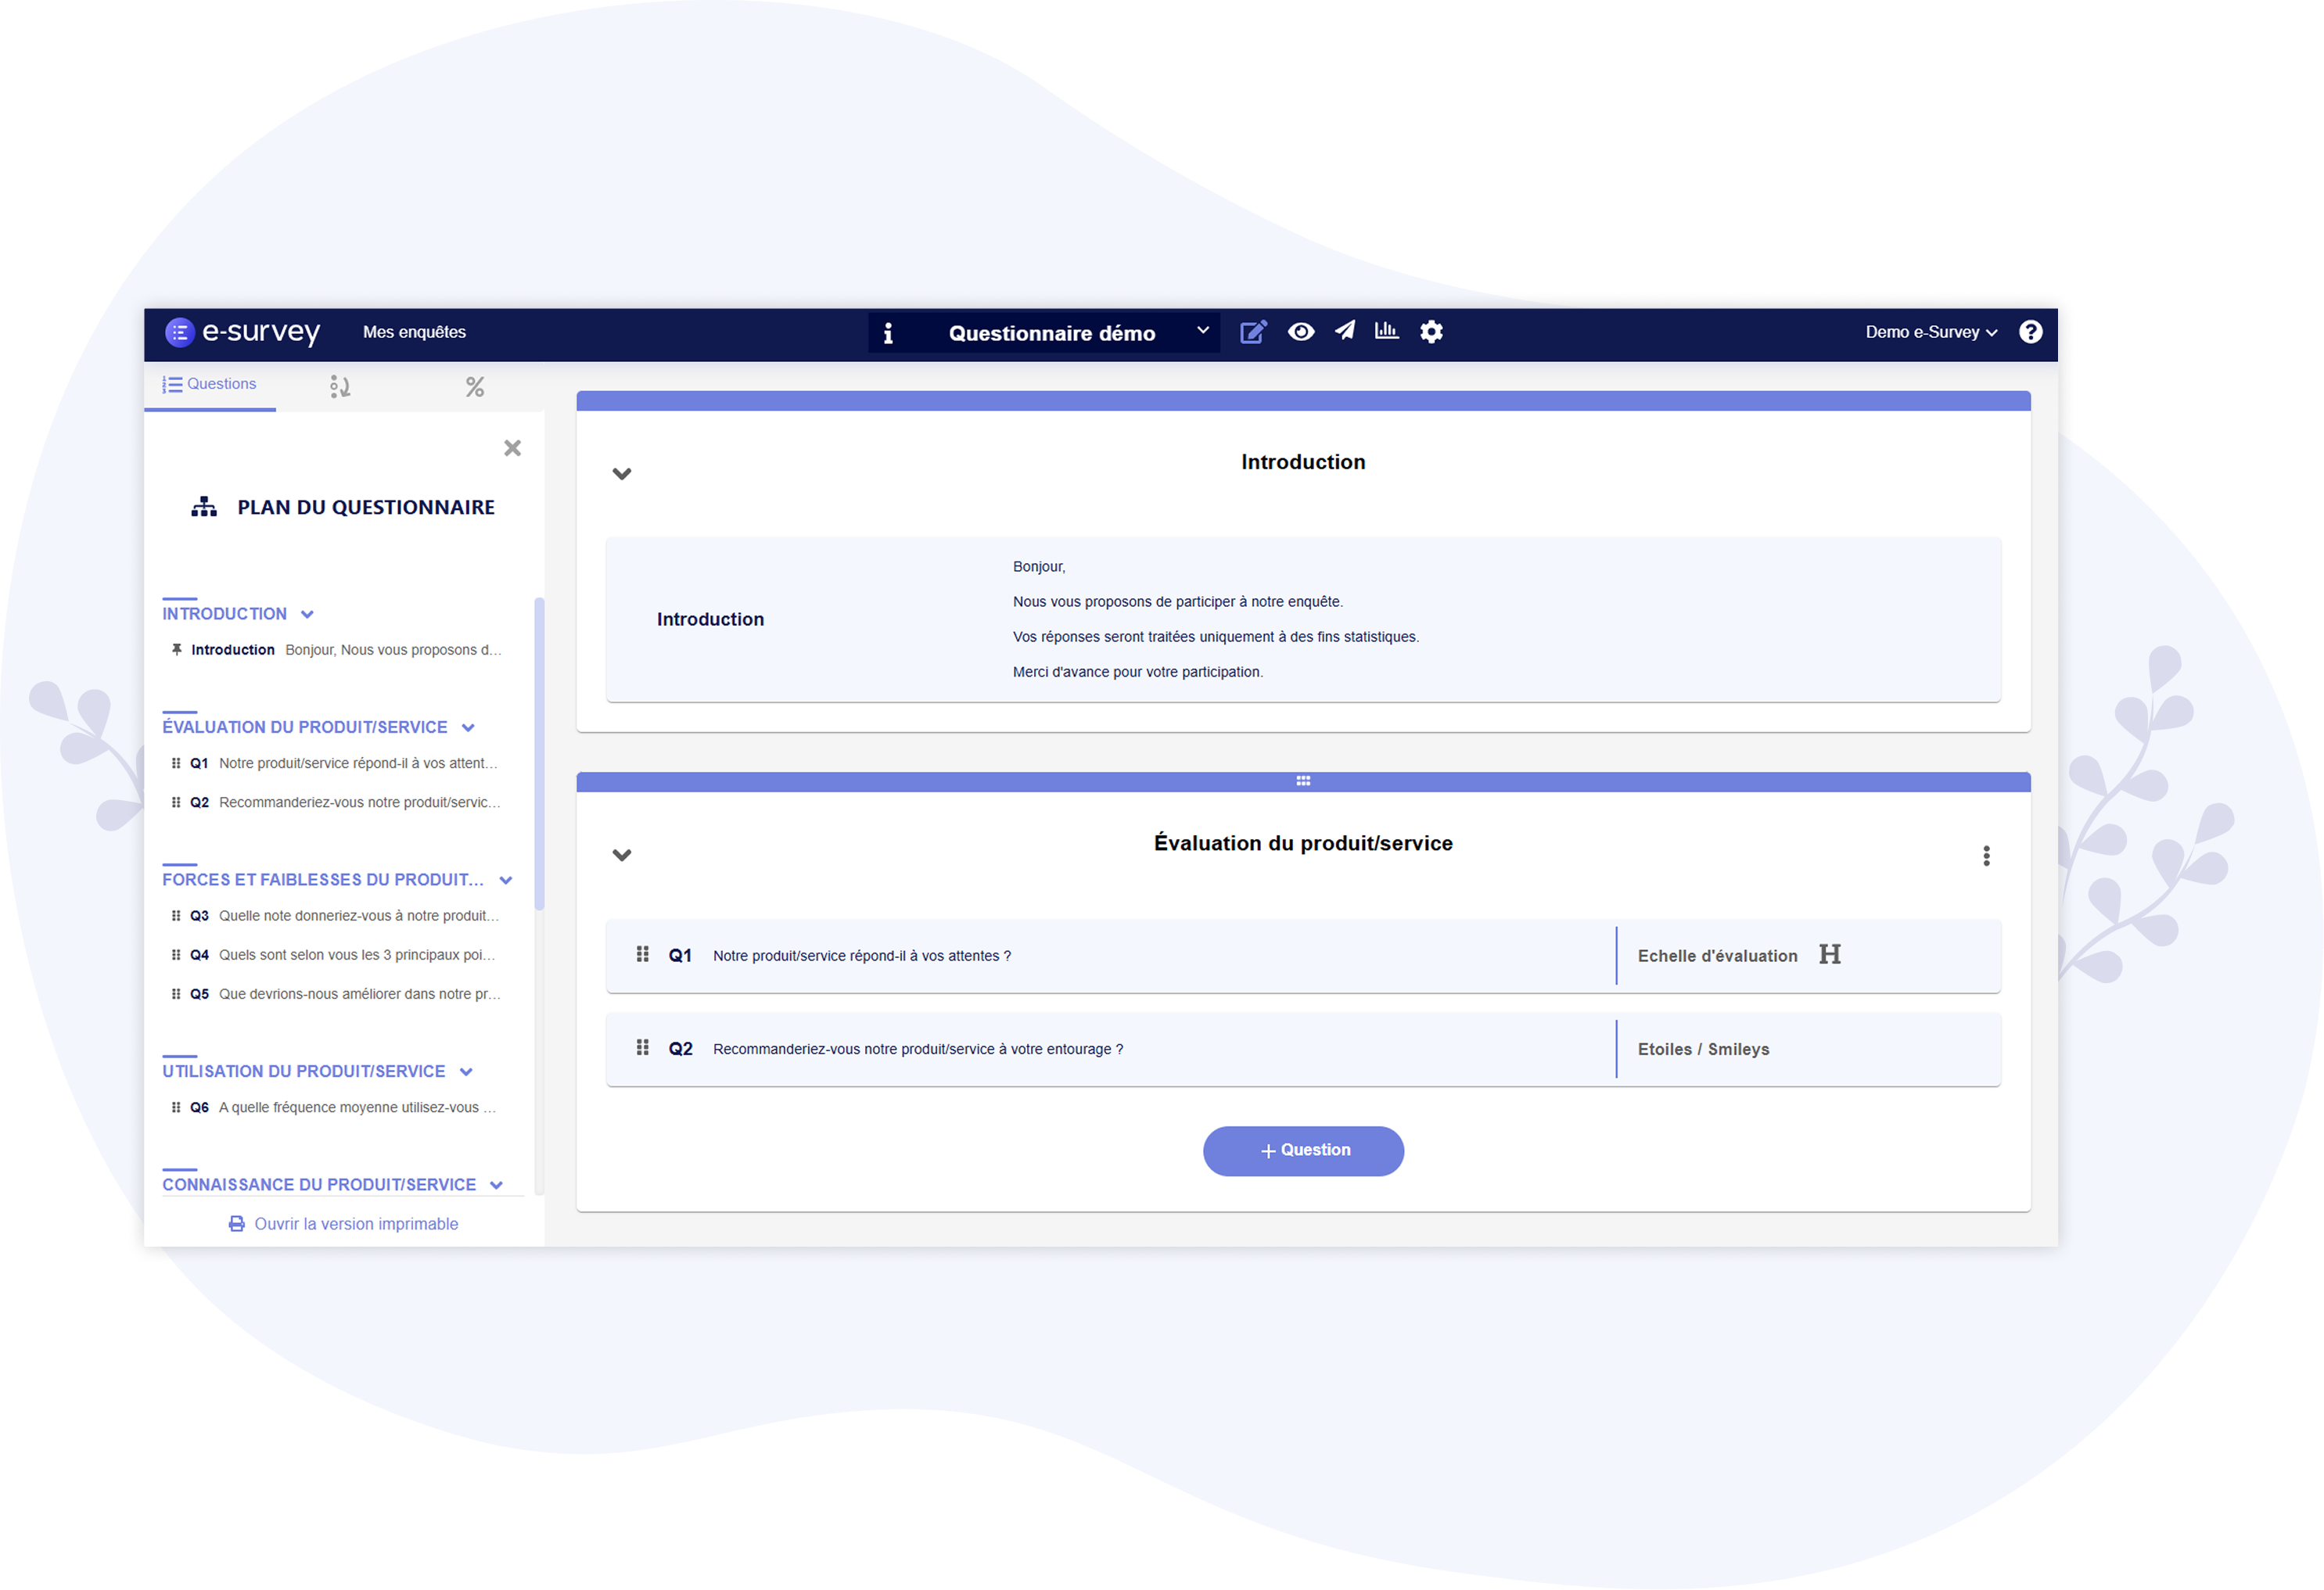
The questionnaire is structured as follows:
- An Introduction block
- One or more Section blocks, within which questions are located
- A Conclusion block, within which two (or more) Conclusions are located:
- A "Validated profile" Conclusion (default conclusion for all respondents).
- And a "Disqualified profile" Conclusion, to which respondents out of target or with exceeded quotas will be redirected if you add conditional skips and/or quotas in the questionnaire.
You can add other Sections and other Conclusions to the questionnaire by clicking on the "+ Section" button (below the block of the last Section) and the "+ Conclusion" button (at the bottom of the Conclusion block).
Regarding Sections, you can rename them by simply clicking on their name (by default, the name of each Section is: "Section 1," "Section 2," etc.). It should be noted that Sections (and their names) will not be visible to respondents: whether you have one or multiple Sections in your questionnaire, it will not change anything for the respondents. Sections simply help you better organize your questionnaire (e.g., by grouping questions related to the same theme within the same Section block). Sections simply help you better organize your questionnaire (e.g., by grouping questions that relate to the same topic within the same Section block).
To add a Question, simply position yourself in the Section block of your choice and click on the " + Question" button located at the bottom of the block.
A window will then appear, allowing you to choose from 16 types of questions, divided into 4 categories:
- Single Choice
- Multiple Choice
- Open-ended
- Transition page
Single choice question
Single choice table
Single image choice
Rating scale
Stars / Smileys
Multiple choice question
Multiple choice table
Multiple image choice
Ranking
Champs textes
Text boxes
Free text
Numeric box
Contact details
Text / Image
Legal Notices (GDPR)
Consent (GDPR)
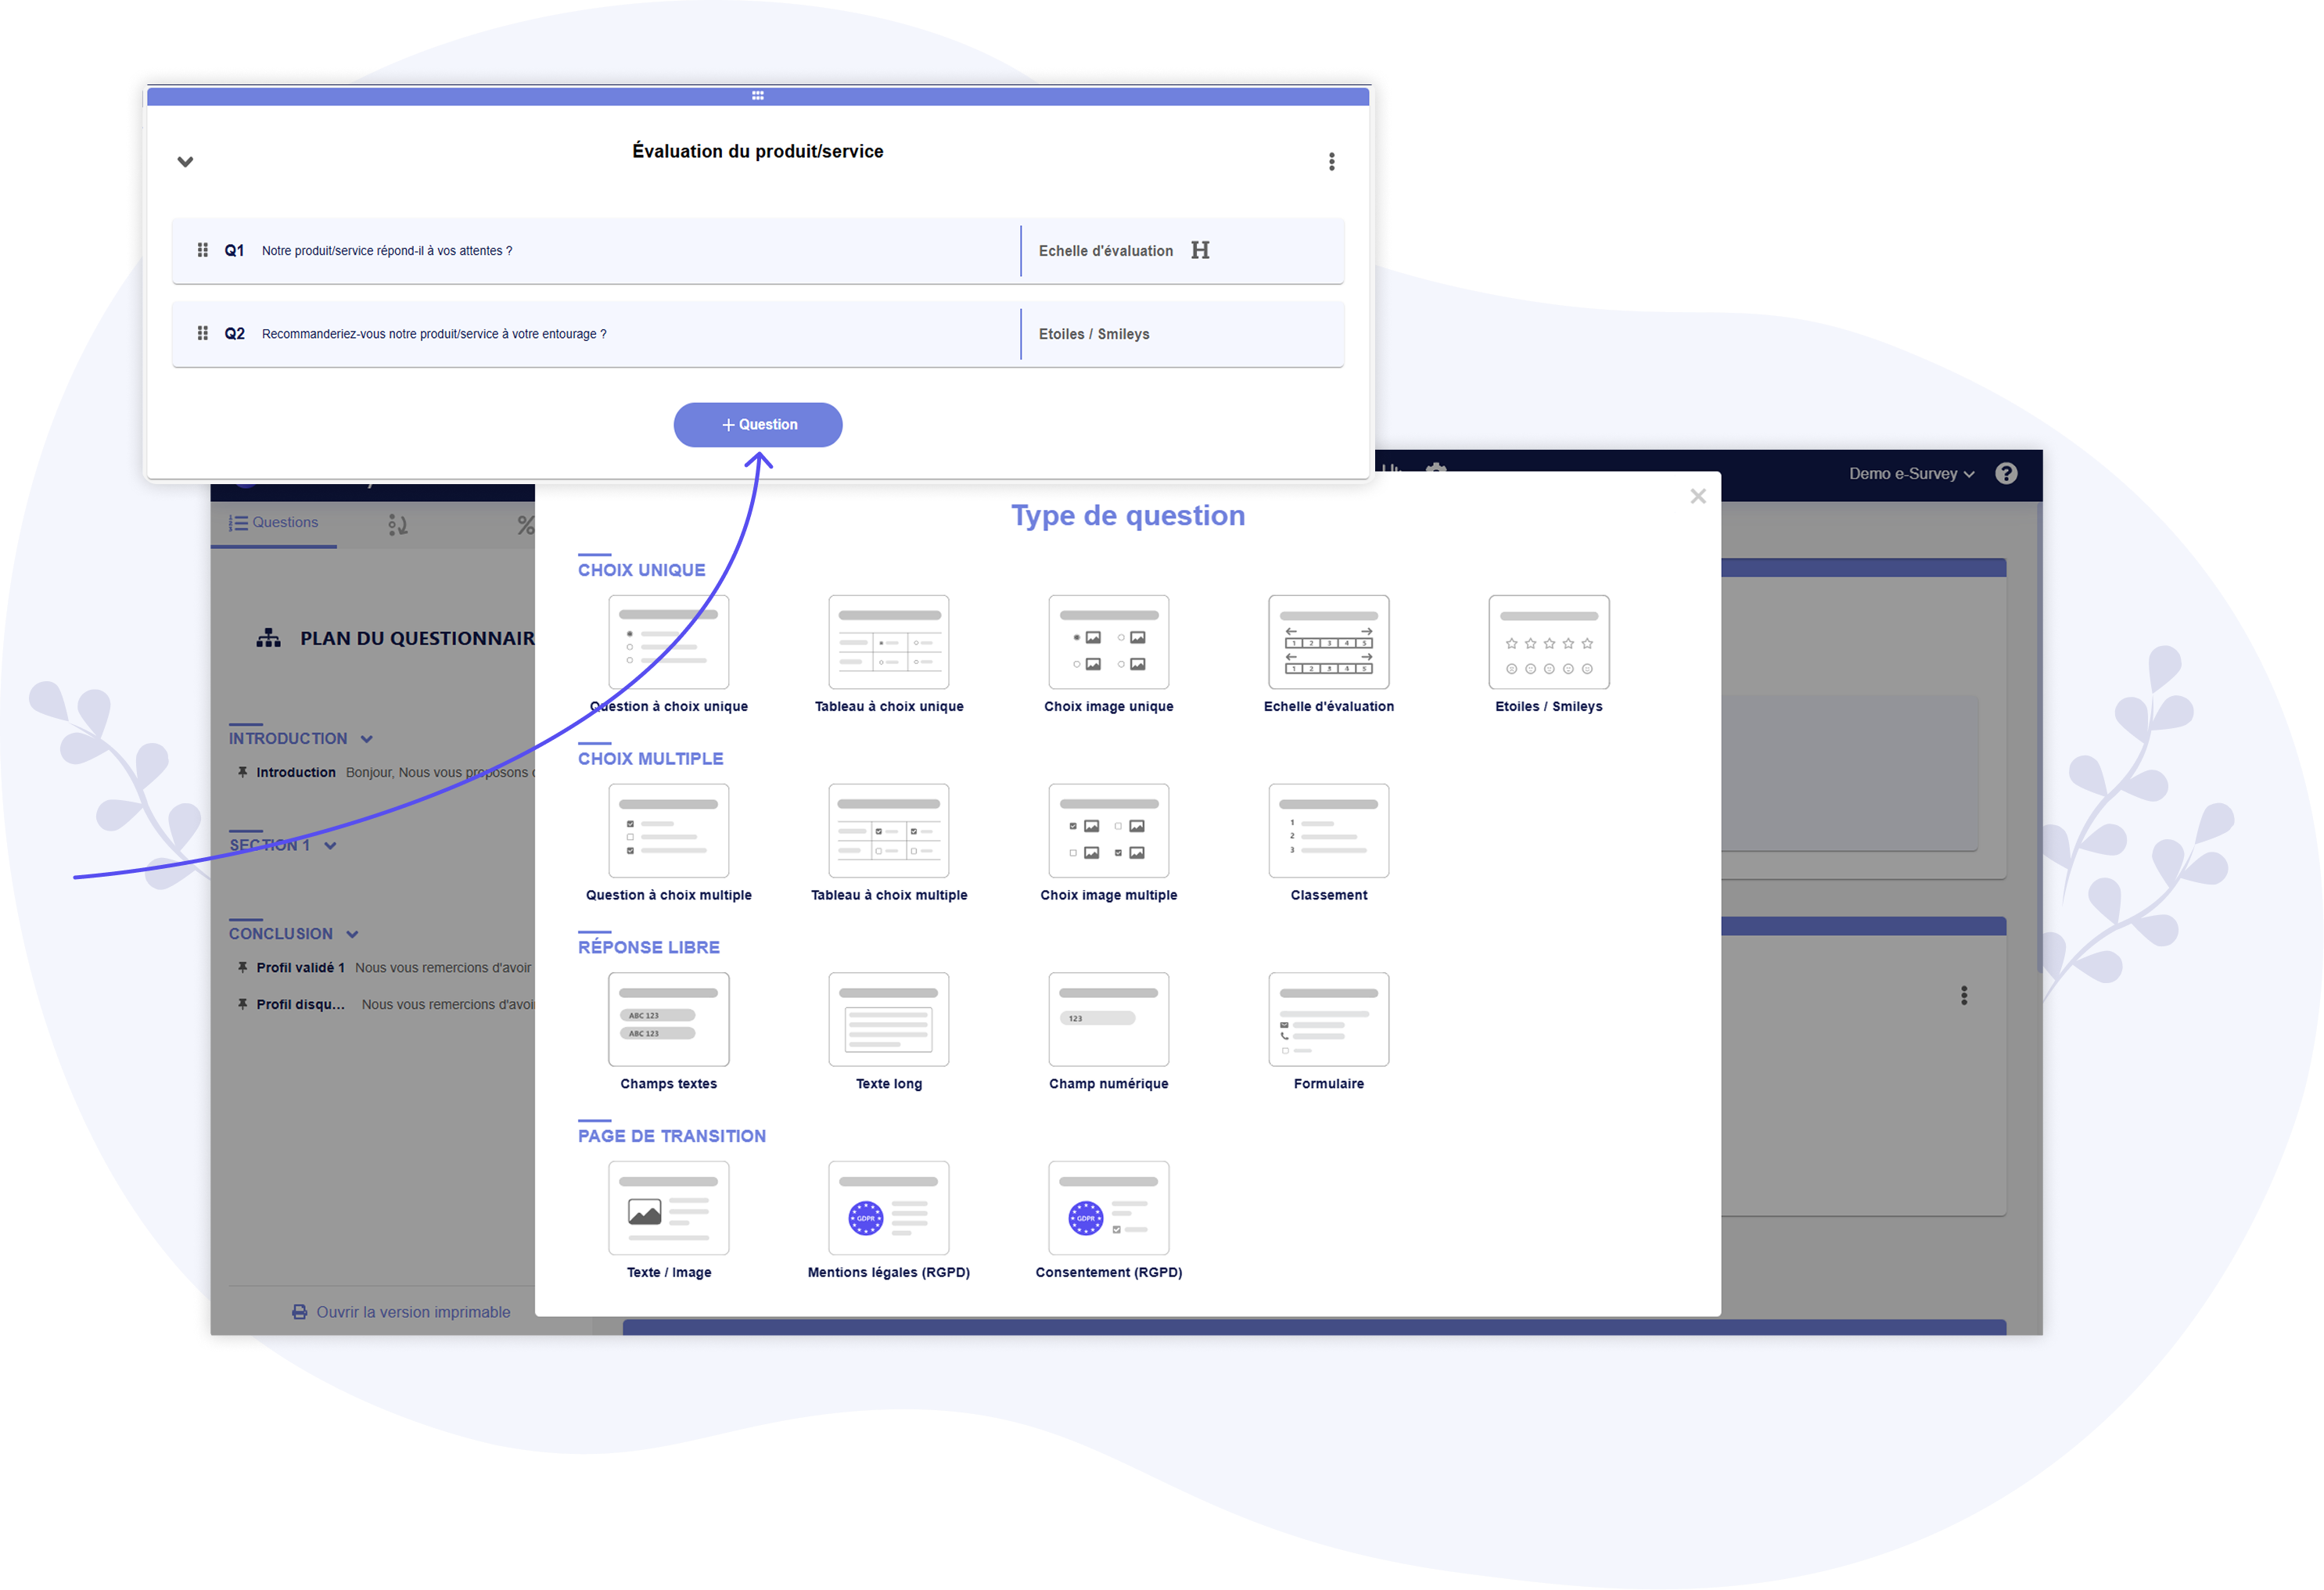
Note that for respondents: 1 Question = 1 page. This means that respondents will see each question on a separate page within the questionnaire (and will need to click the "Next" button after each question to proceed to the next one). Questions will not be displayed underneath each other on the same page.
Consequently, Transition Pages allow you to create pages in the questionnaire containing only text, images, videos, etc. (with no questions). For these pages, you can choose between blank Transition Pages (the "Text / Image" block) to be filled with the content and/or media of your choice, and pre-made Transition Page templates with already written content to help you meet your legal obligations (such as GDPR legal mentions, consent collection, etc.).
Note:
While editing the questionnaire, you can easily move each element (section, question, etc.) using drag and drop.
This also works in the panel on the far left of the screen, where you’ll find the Questionnaire Plan.
3 - Edit questions
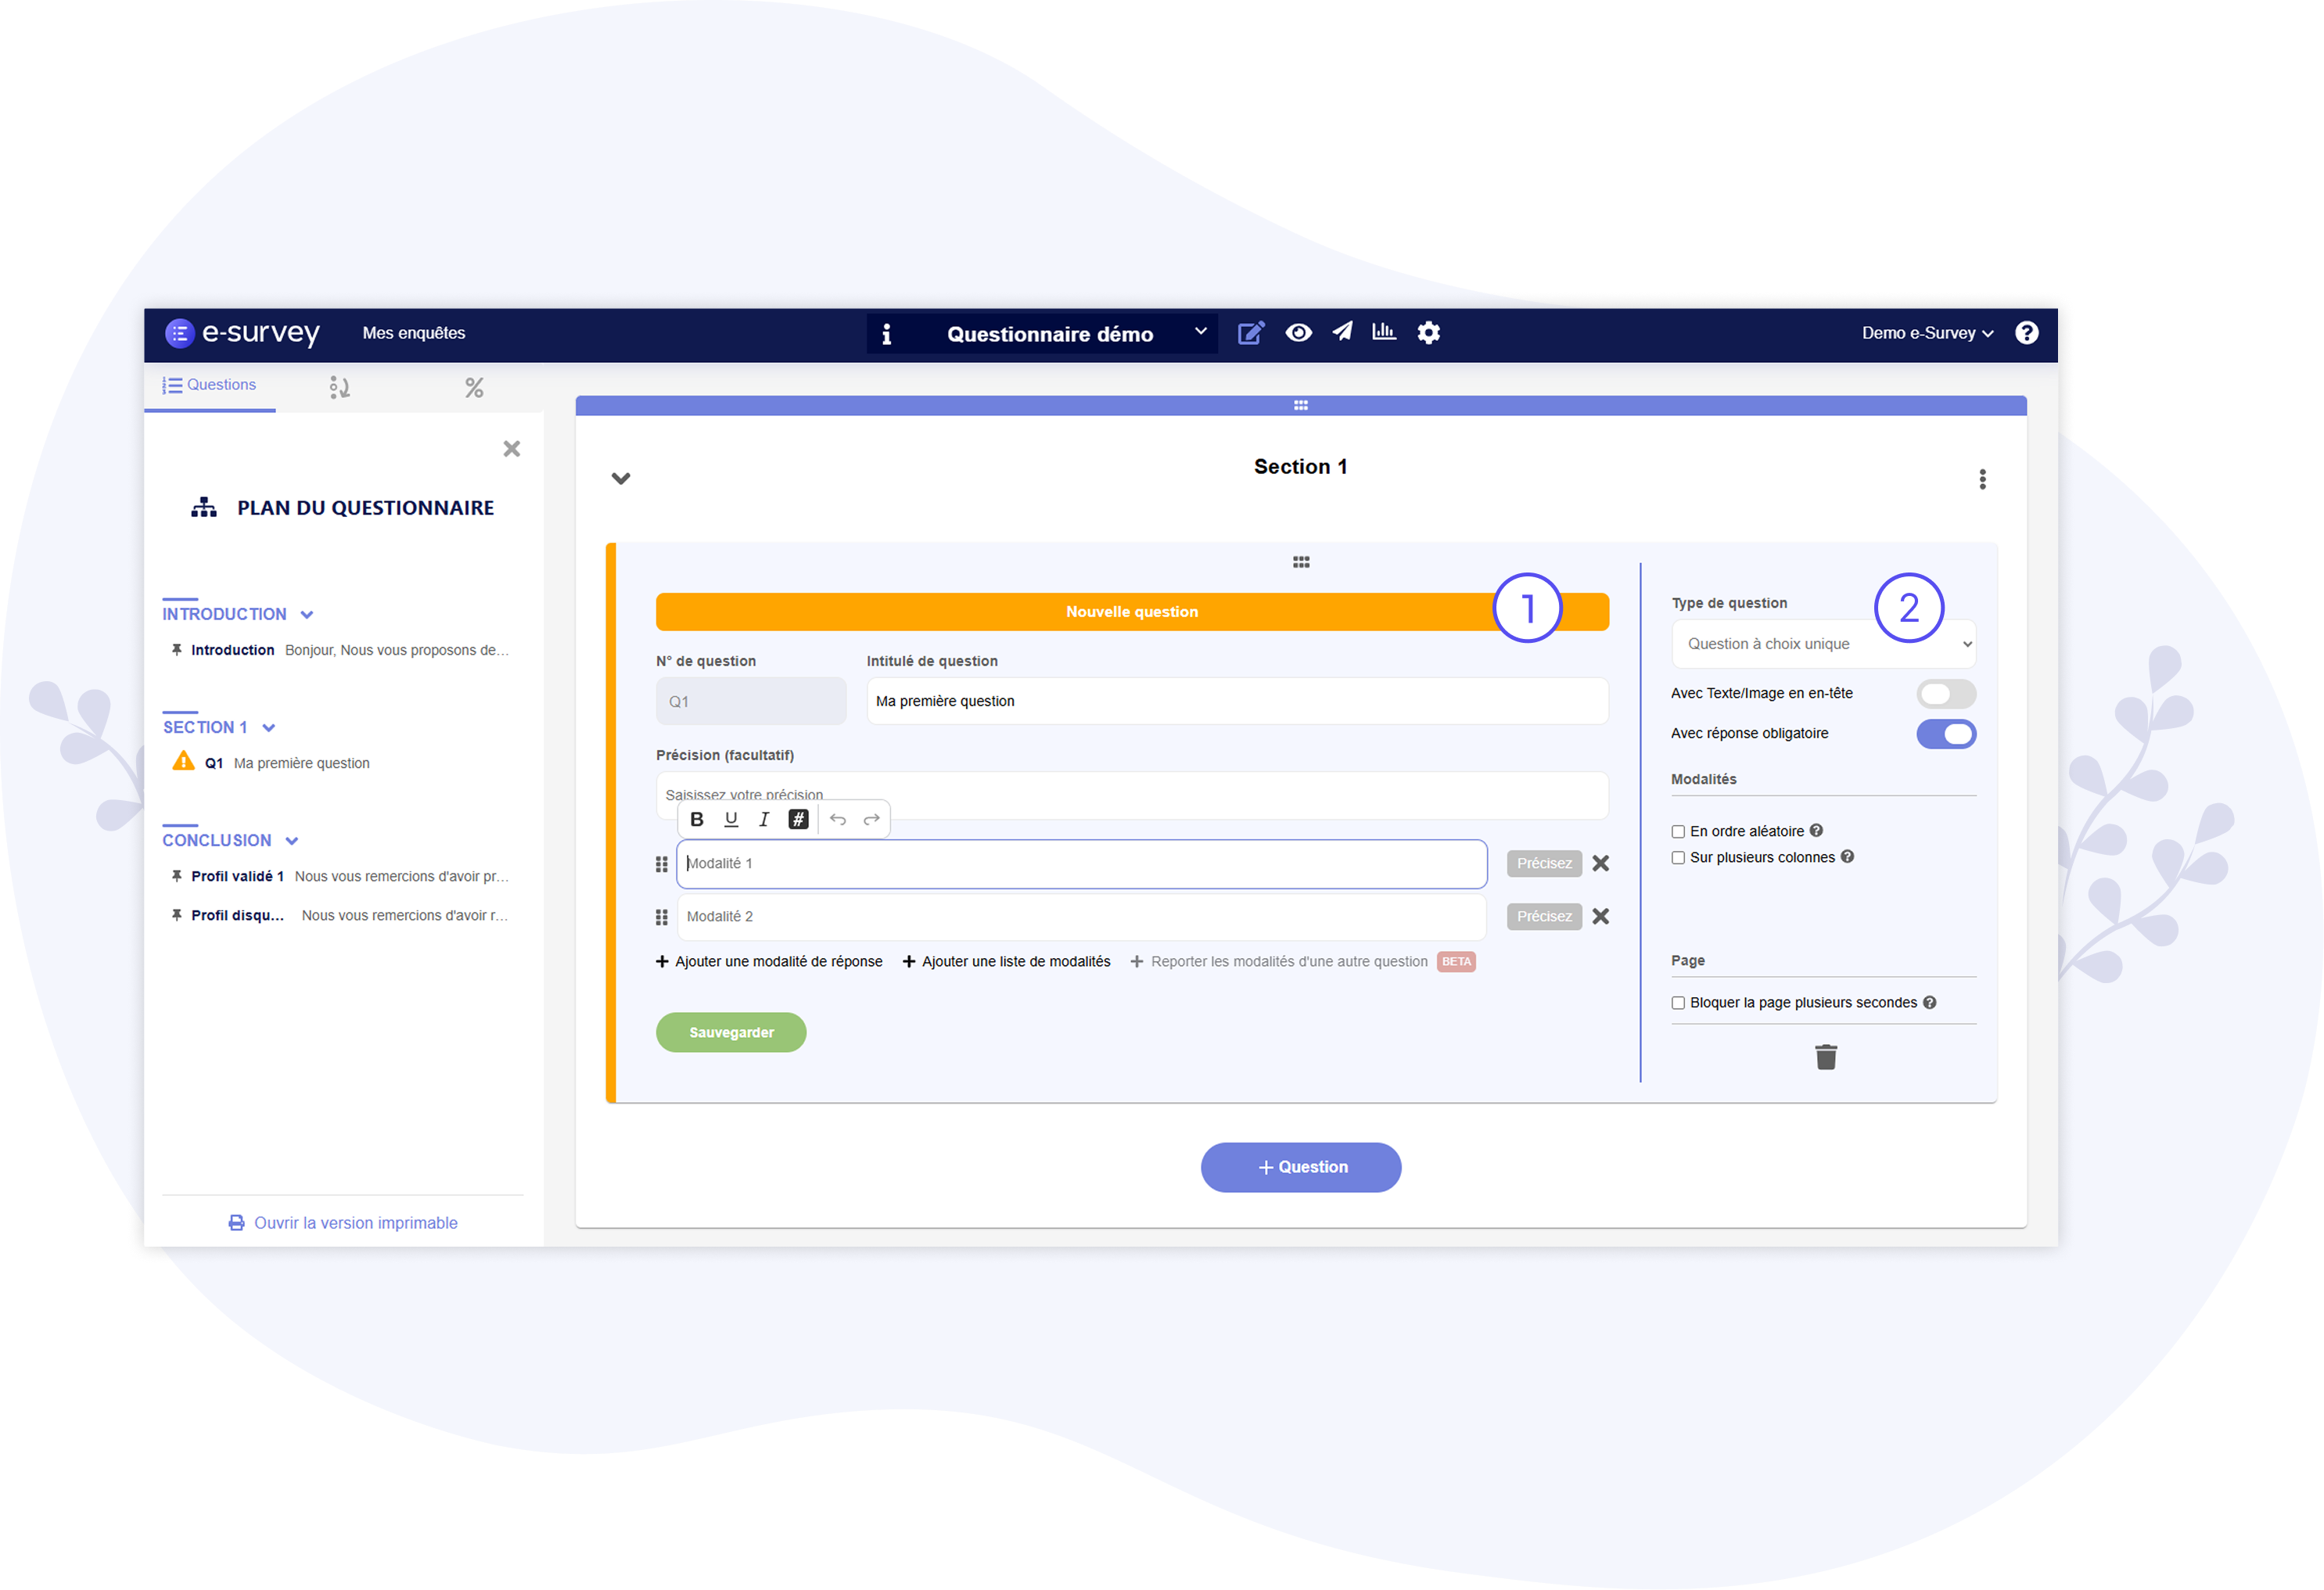
Every time you add a new question, a Question block is created at the end of the Section. You can then fill in the details (question title, answer options, etc.) within the Question block (1) and configure the question options on the right-hand side of the block (2).
The fields to fill in within the block, as well as the options, depend on the type of question you have selected.
Among the options, you’ll find the ability to:
- Make the question optional for respondents.
- Add text, an image, or a video as a header for the question (above the title): This option is similar to Transition Pages (see above), with the difference that, for respondents, the content will appear on the same page as the question (just above it).
- Present the response options in random order for respondents.
- Lock respondents on the Question for several seconds: this will prevent respondents from proceeding to the next question until the specified time has completely elapsed. This option is particularly useful if you have a text and/or an image as a header for the Question (or when using a Transition Page) and wish to ensure respondents take the time to read or view the content.
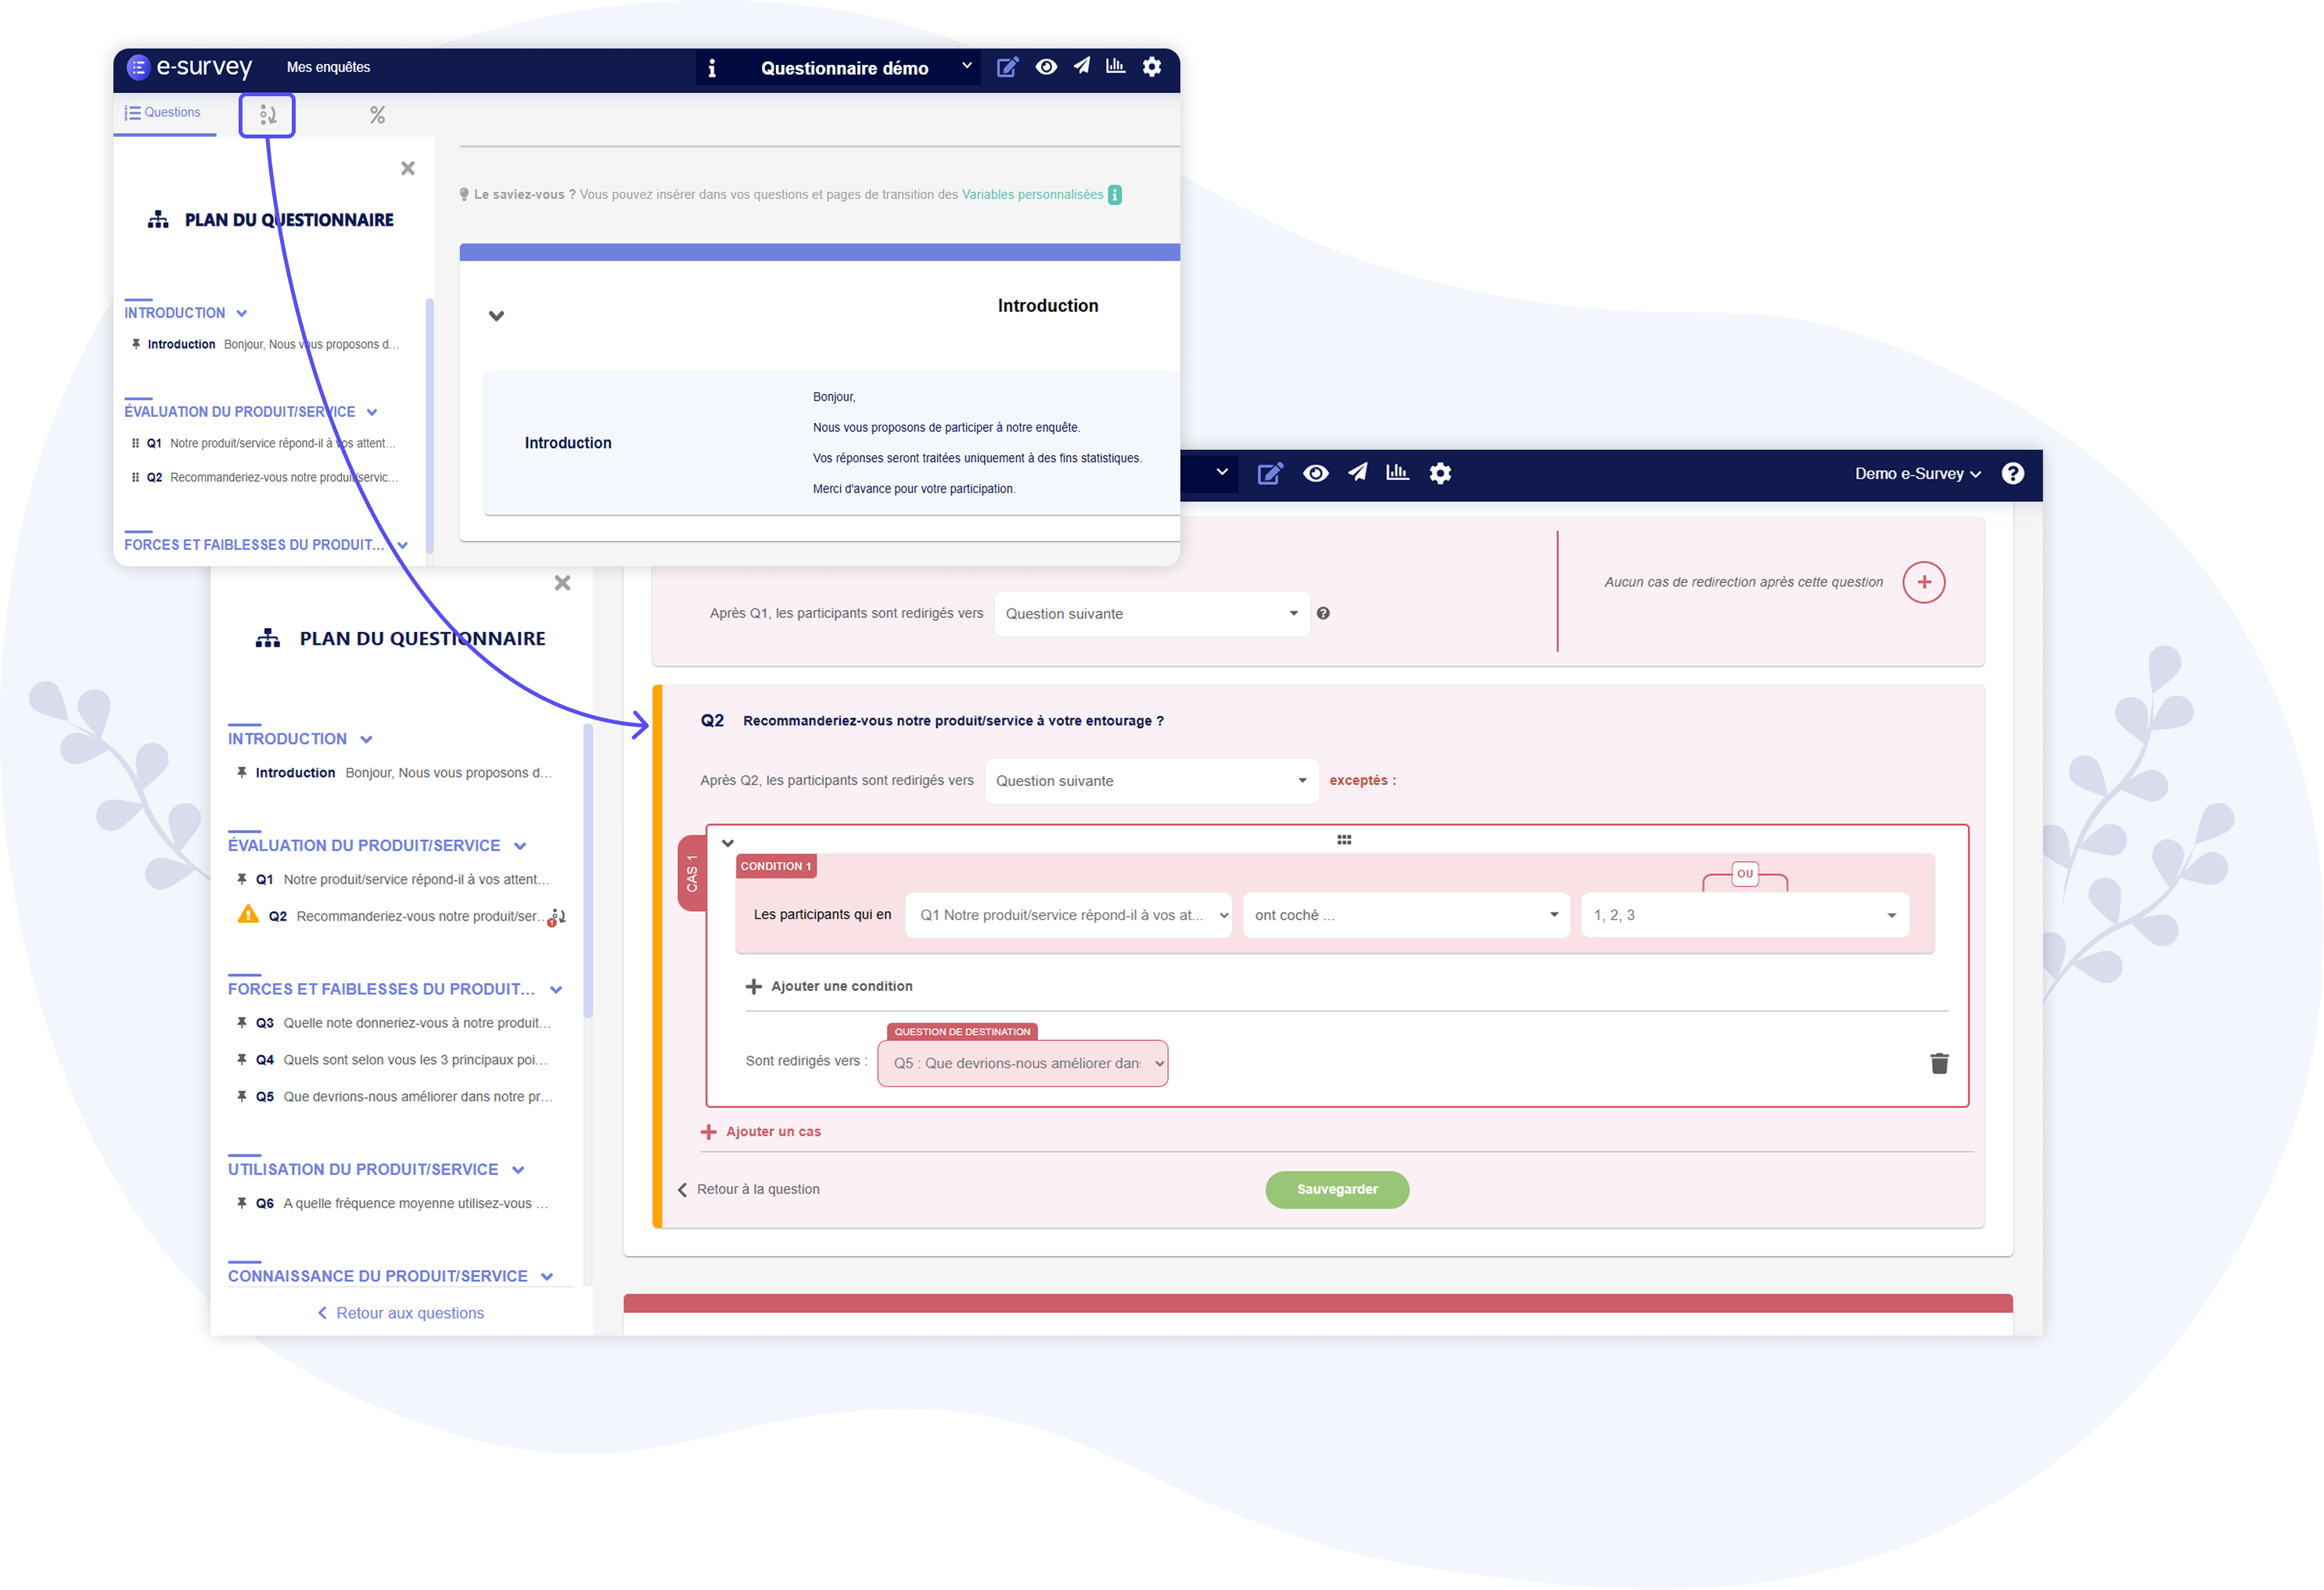
4 – Adding Conditional Routings (Optional)
From the "Routings" tab, you can add Conditional Routings after each question to guide certain respondents to a different question further along in the questionnaire (thus allowing them to "skip" questions not relevant to them).
For instance, if certain questions (e.g., Q2 and Q3) are only intended for respondents aged 25 to 34, you
could add a Conditional Routing after the age question (e.g., Q1) to redirect respondents aged 35 and older
directly to Q4.
You can also, using Conditional Routings, disqualify respondents, meaning exclude them from the survey if
their profile does not match your survey requirements.
Furthermore, it is also possible to create another type of Routings: Randomized Redirects – See the complete tutorial on Random Routings
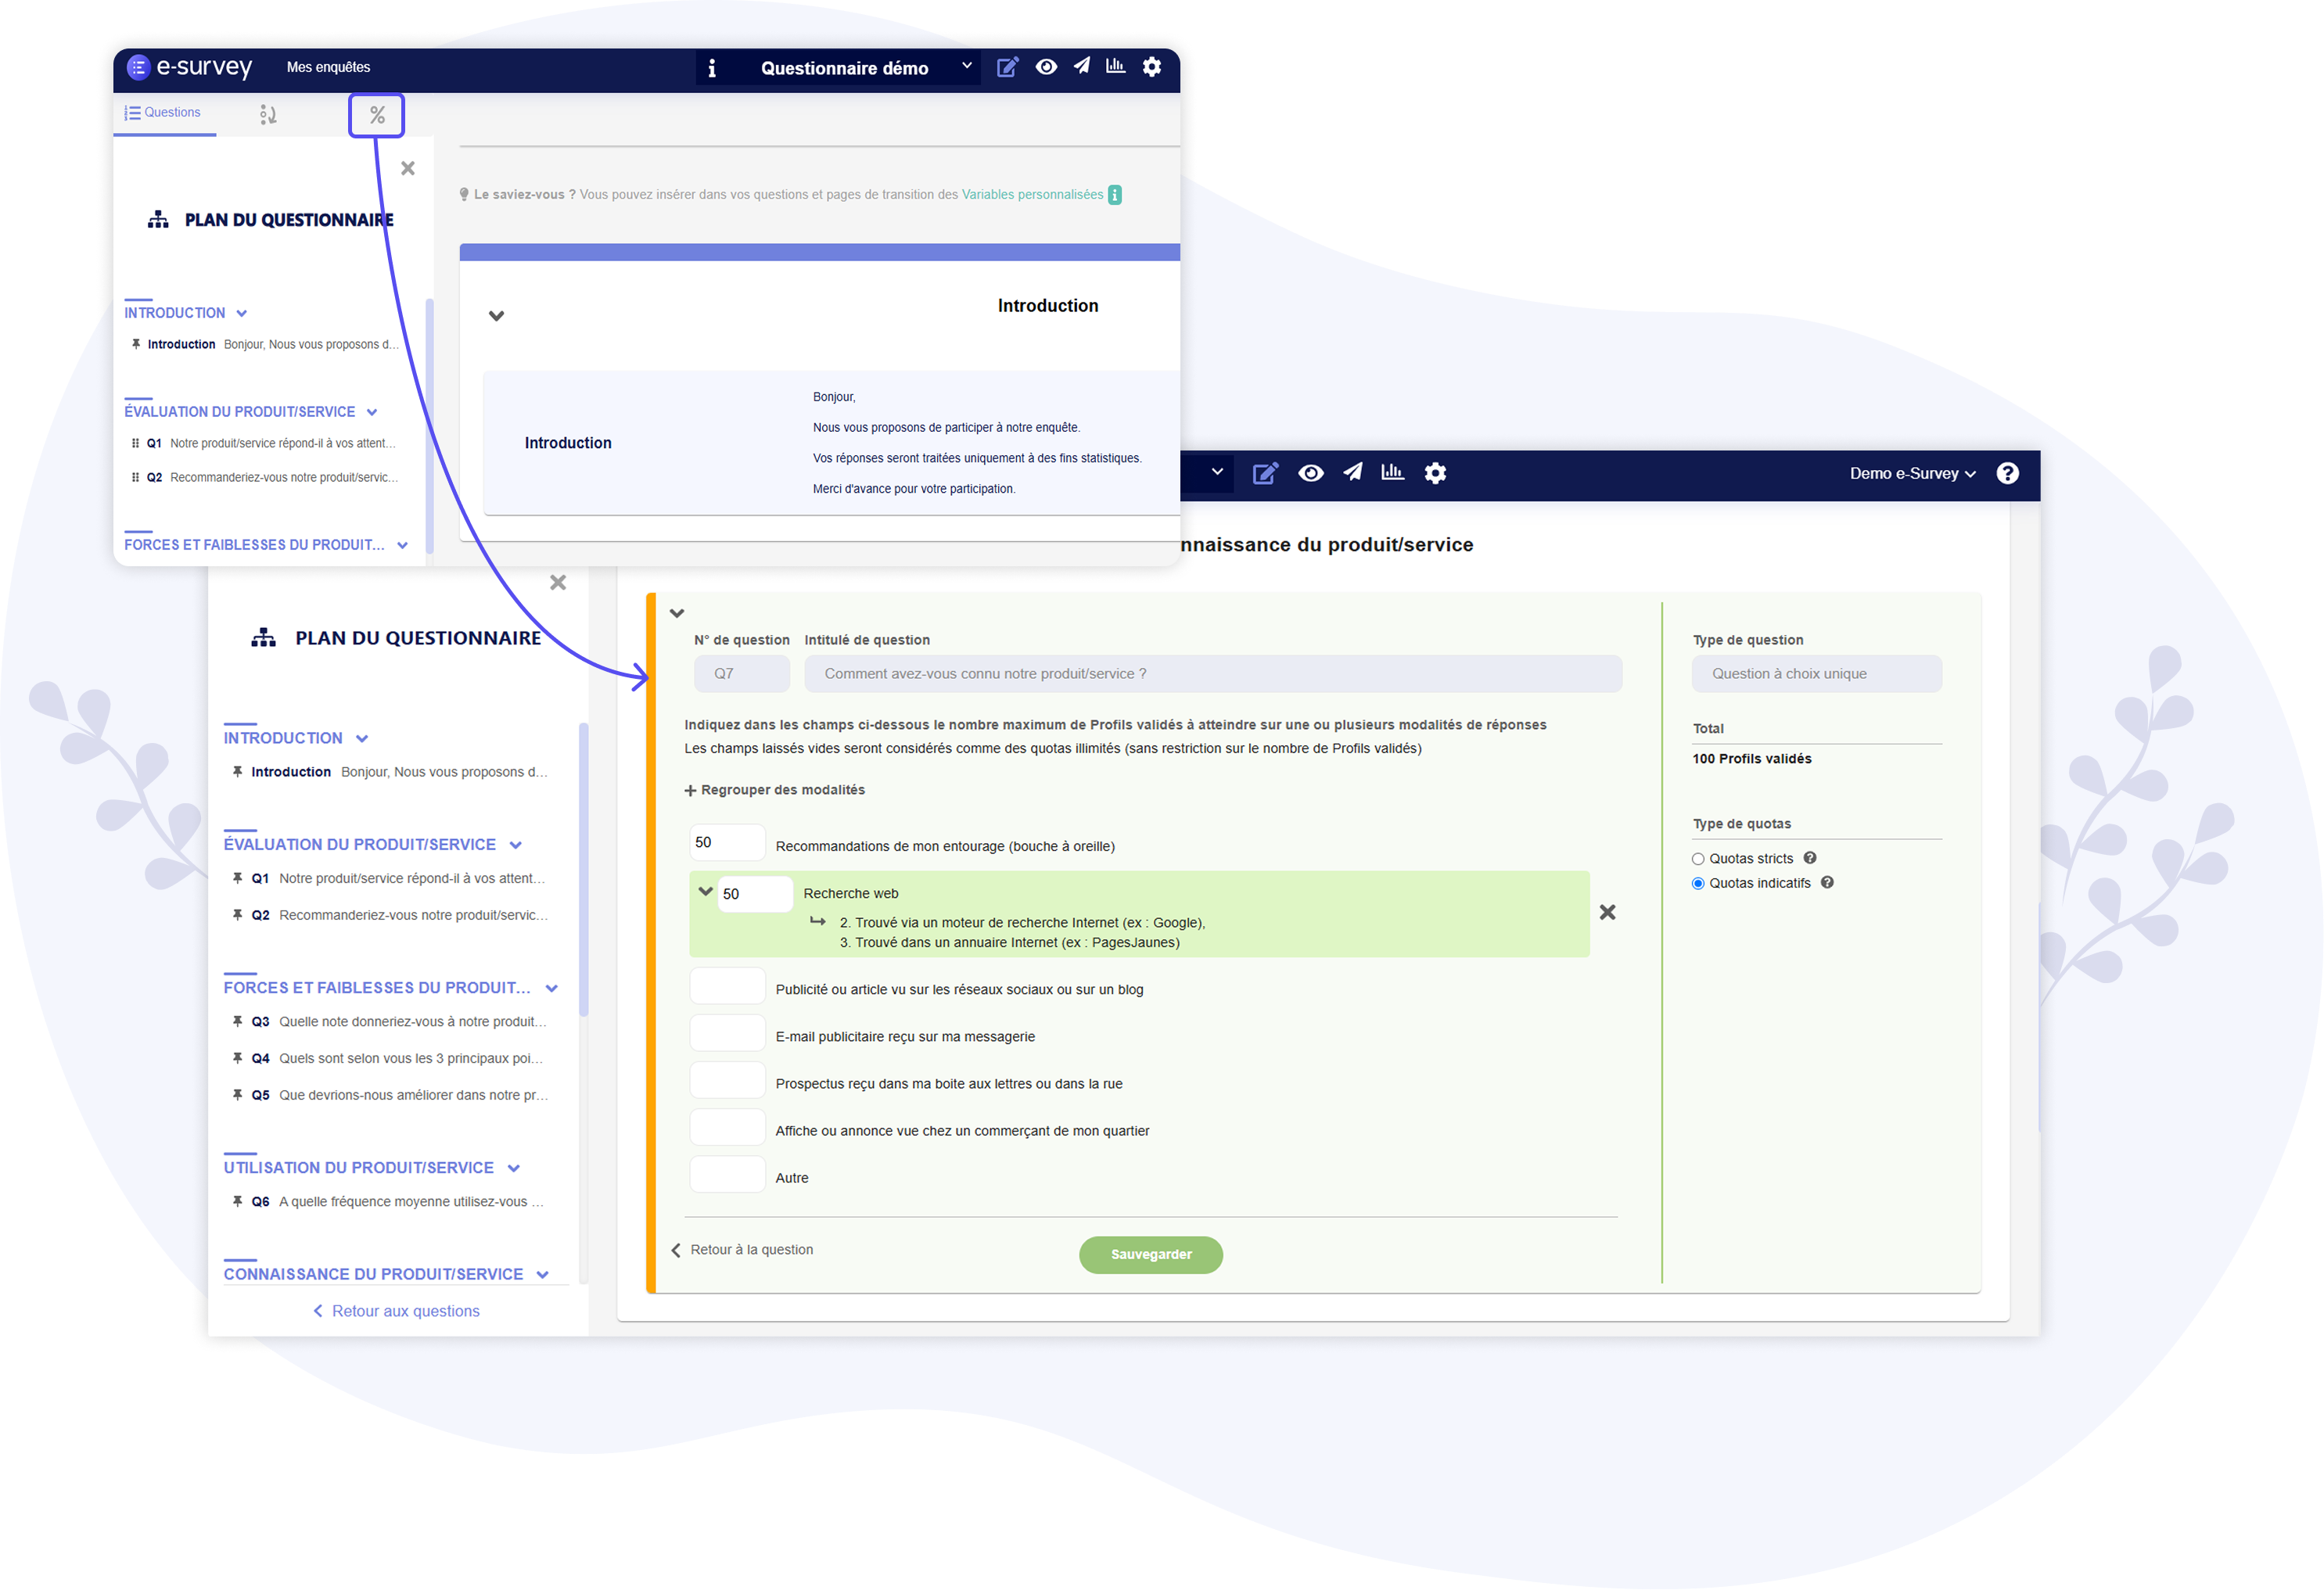
5 – Adding Quotas (Optional)
From the "Quotas" tab, you can add Quotas to each question (except for Ranking questions and Free Response questions).
There are several types of Quotas:
-
Strict Quotas for Single Choice questions
If the respondent selects an answer option for which the quota is already met, they are automatically disqualified. -
Strict Quotas for Multiple Choice questions
As soon as the respondent falls into a quota that is already met, they are automatically disqualified (even if they select other options for which the quotas are not yet met). -
Flexible Quotas for Multiple Choice questions
As long as the respondent falls into a quota that is not yet met, they can continue the survey (even if they select other options for which the quotas are already met). Conversely, if they only select options for which all quotas are already met, they are automatically disqualified. -
Indicative Quotas (for all question types)
These are non-binding quotas: even if the respondent selects only options for which all quotas are already met, they can still continue the survey (no disqualification).
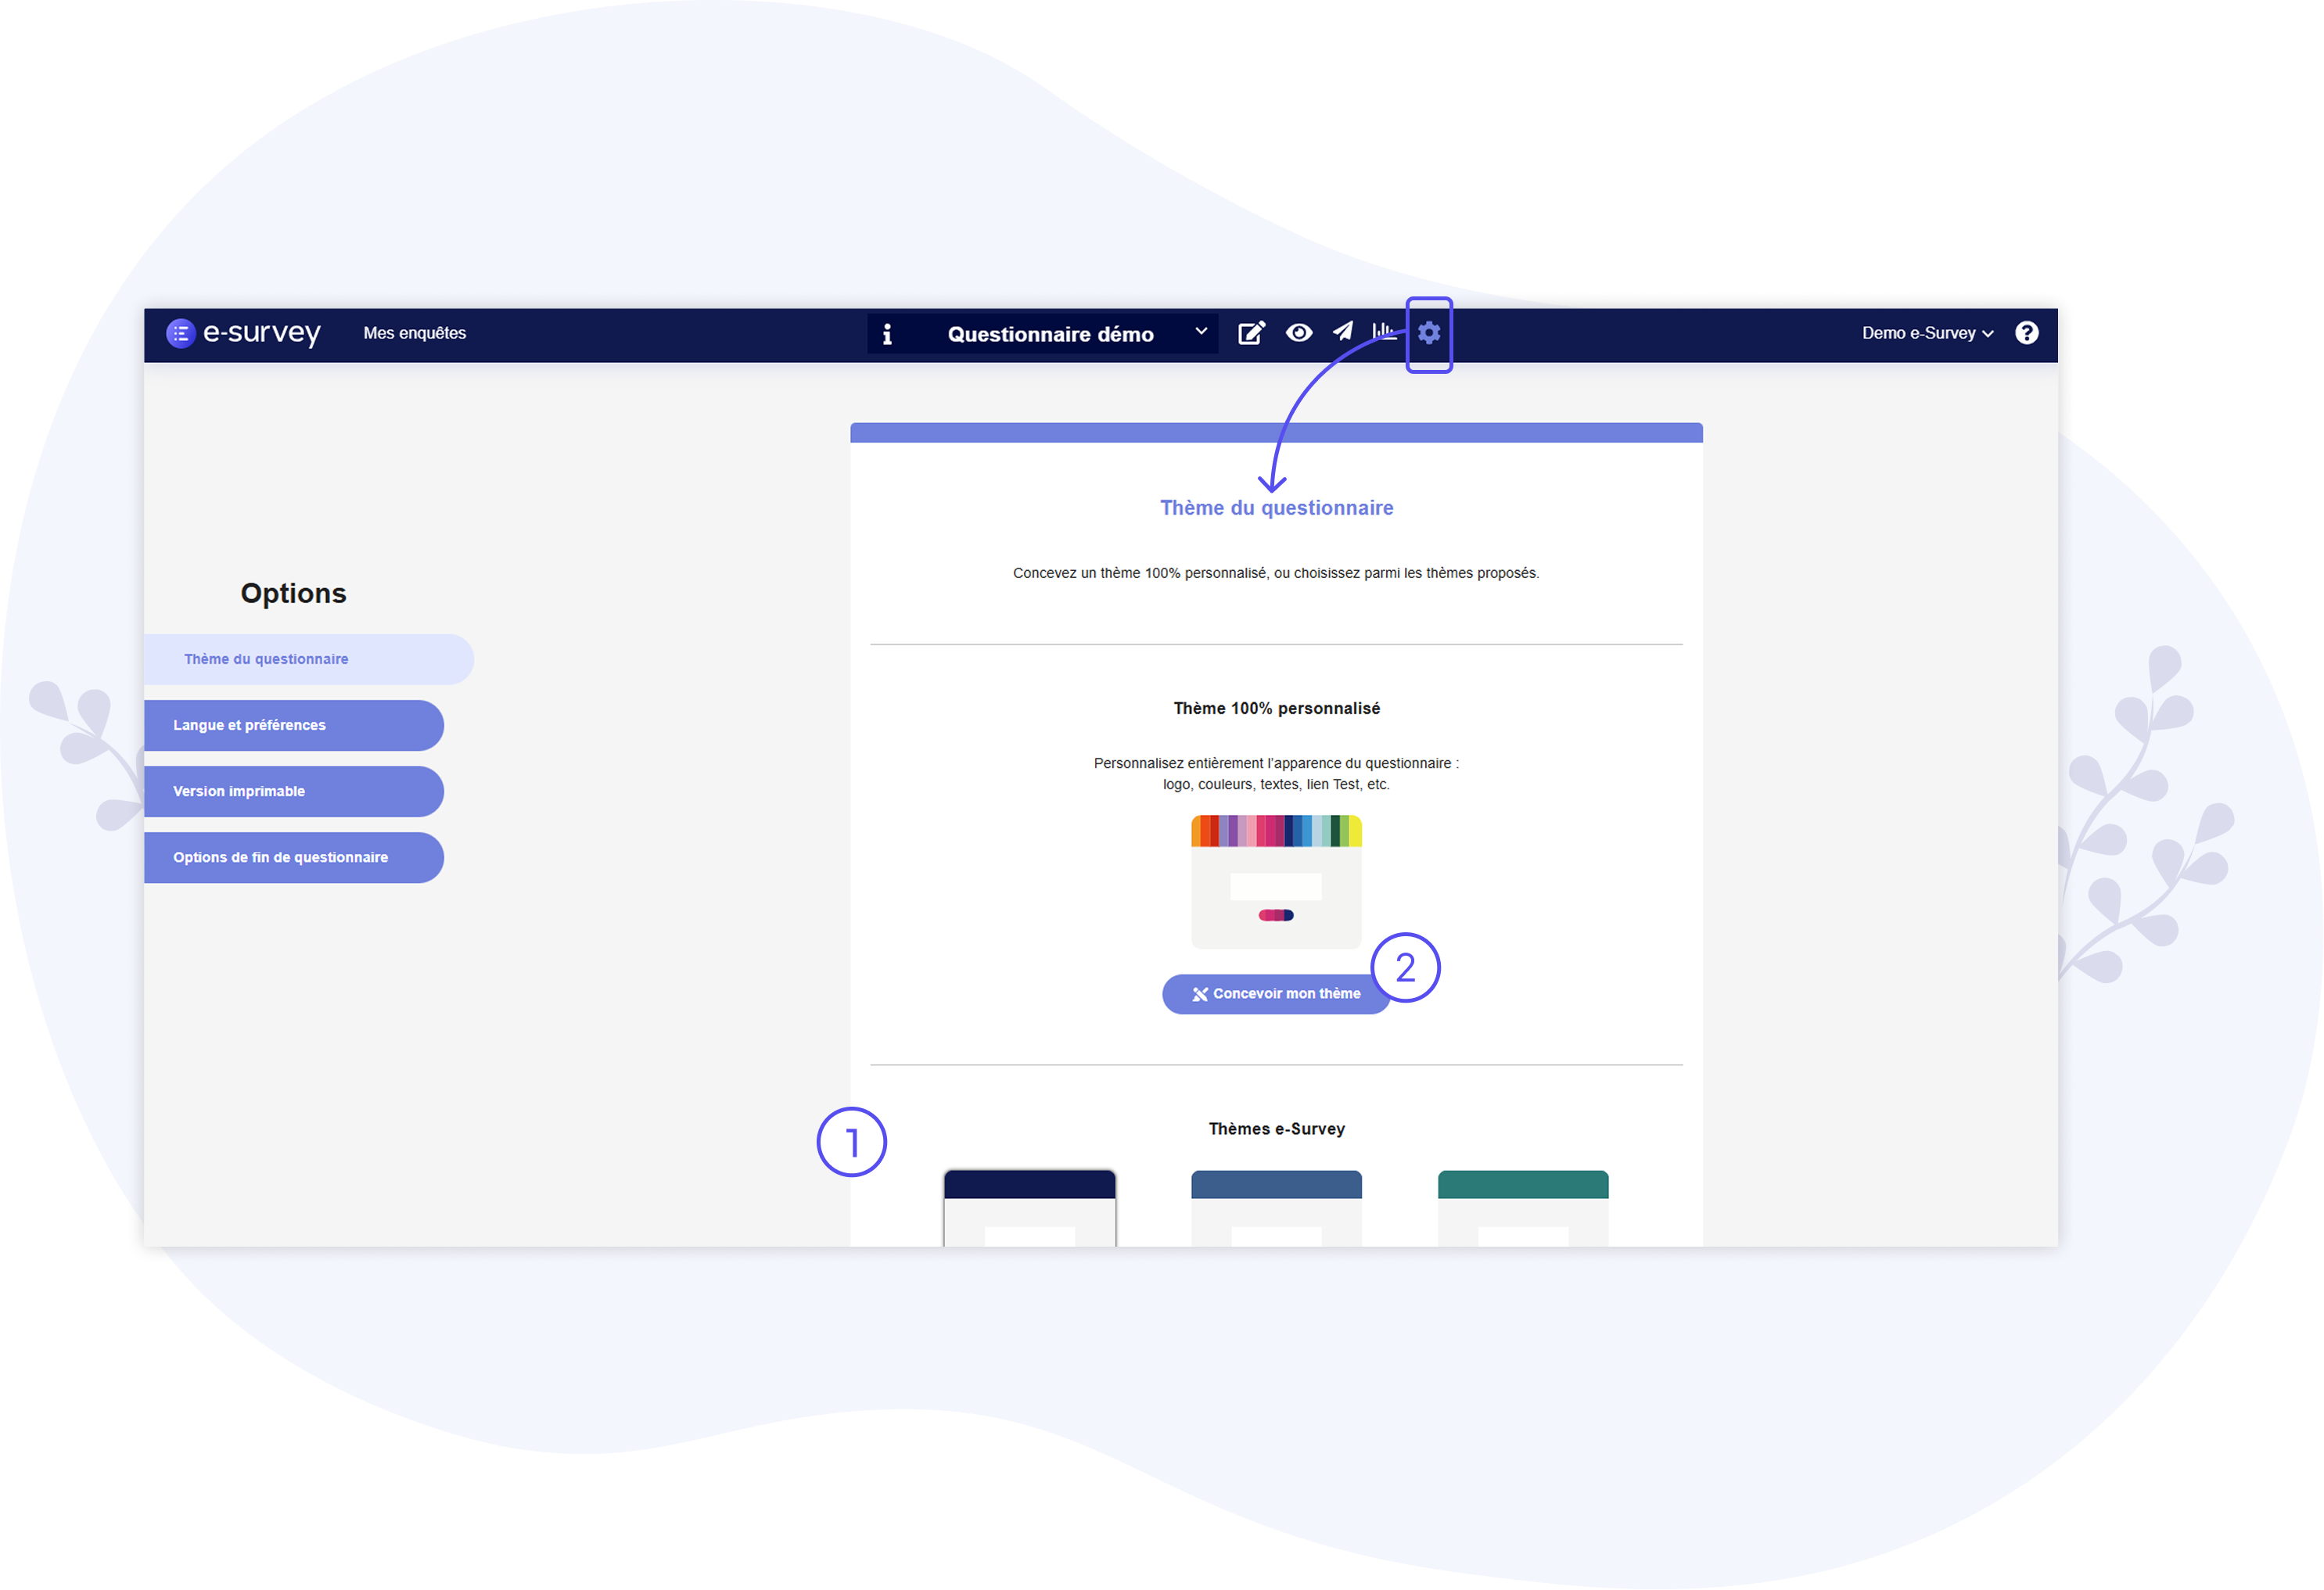
6 – Configuring Questionnaire Options (Optional)
By navigating to the "Questionnaire Options" page, you can modify certain features of the questionnaire: language of the survey, display preferences, question title sizes, redirects at the end of the questionnaire (e.g., automatically redirecting respondents to your website at the end of the survey), etc.
It is also from this page that you can modify the Design of the questionnaire by choosing a Theme (1) (from the available Themes) or by fully customizing the design with your logo, colors, etc. (2) (100% personalised Theme) – See the complete tutorial on Custom Design
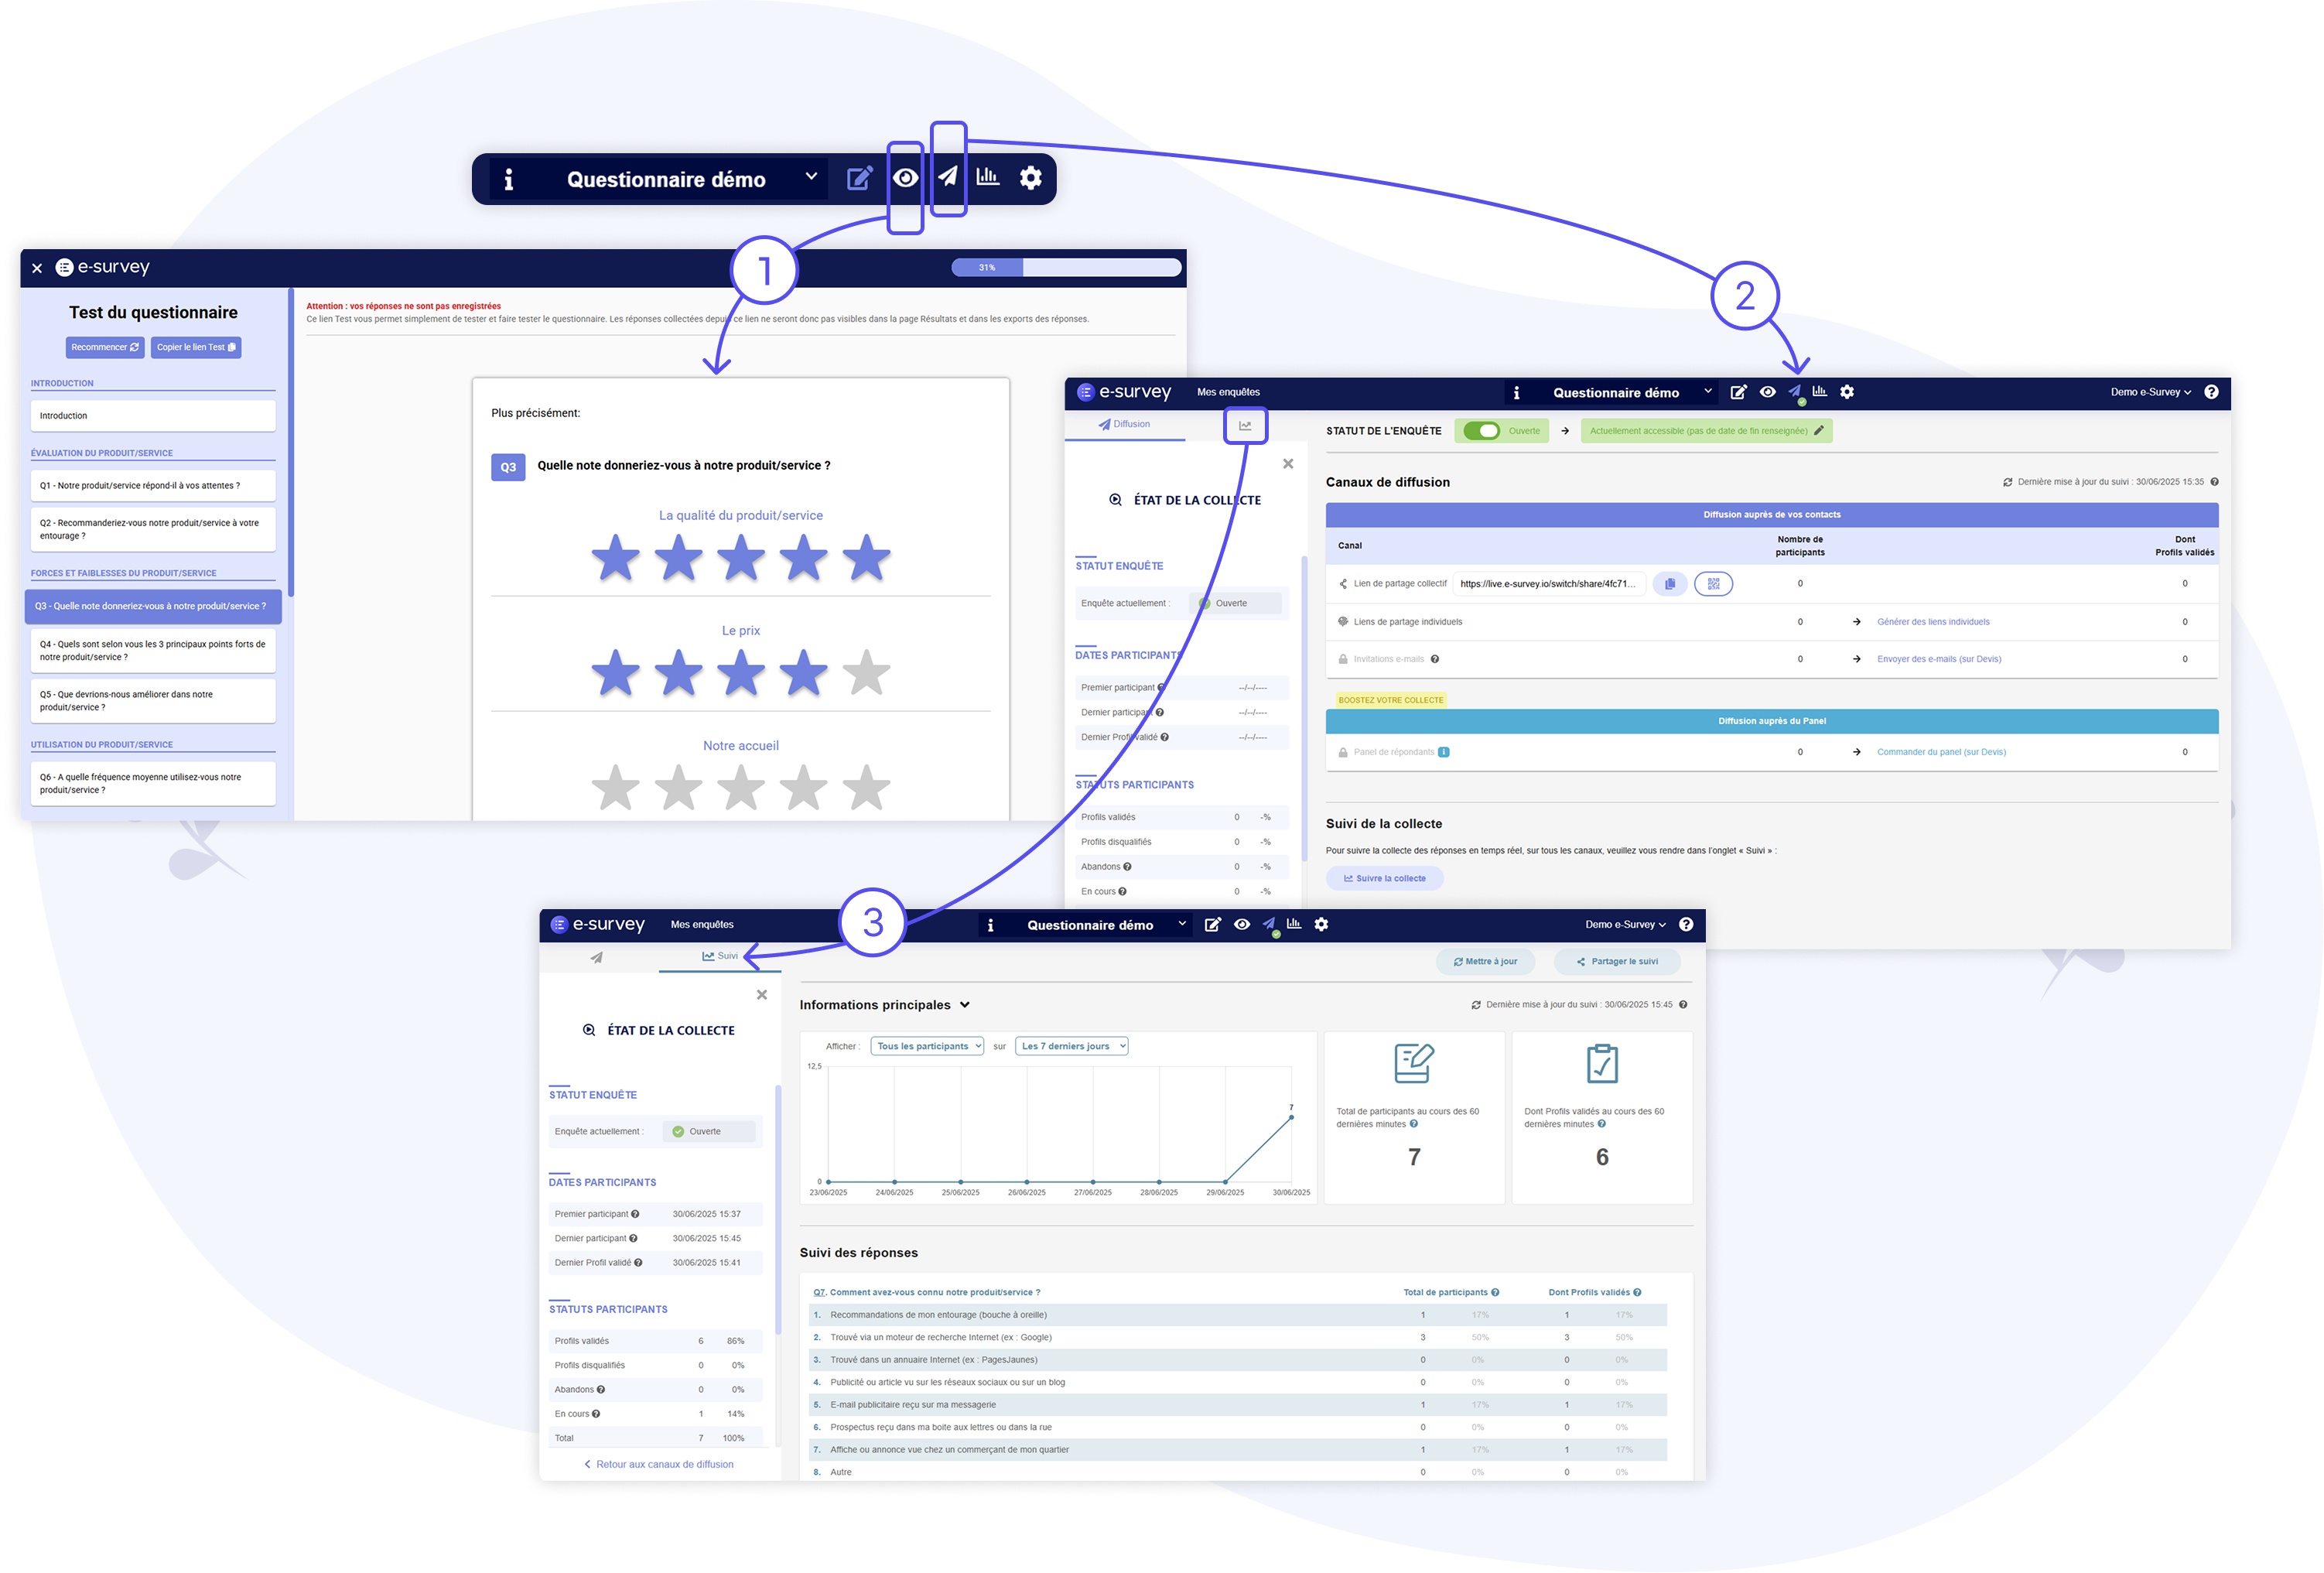
7 – Testing & Distributing the Survey
Once the construction of your questionnaire is complete (Questions, Redirects, and Quotas), you can:
Test the questionnaire
By clicking on the "Test Questionnaire" or "Preview" icon – Eye Icon (1) – available in various places on the platform
Distribute the questionnaire
By going to the "Distribution" page (2) and choosing the most
appropriate distribution method(s):
- Distribution to your contacts via the "Collective Sharing Link," "Individual Sharing Links," and "Email Invitations" channels (details on how to use each channel are provided directly on the platform).
- And/or Distribution to the Panel of respondents - See the complete tutorial on the Panel of Respondents.
Track the collection in real-time
From the "Collection Tracking" tab (3) (or "Tracking"),
you will be able to monitor the progress of the collection in real-time and "track" the responses to the
questions of your choice. From this same tab, you will also be able to create a Shared Dashboard – See the complete tutorial on Dashboards
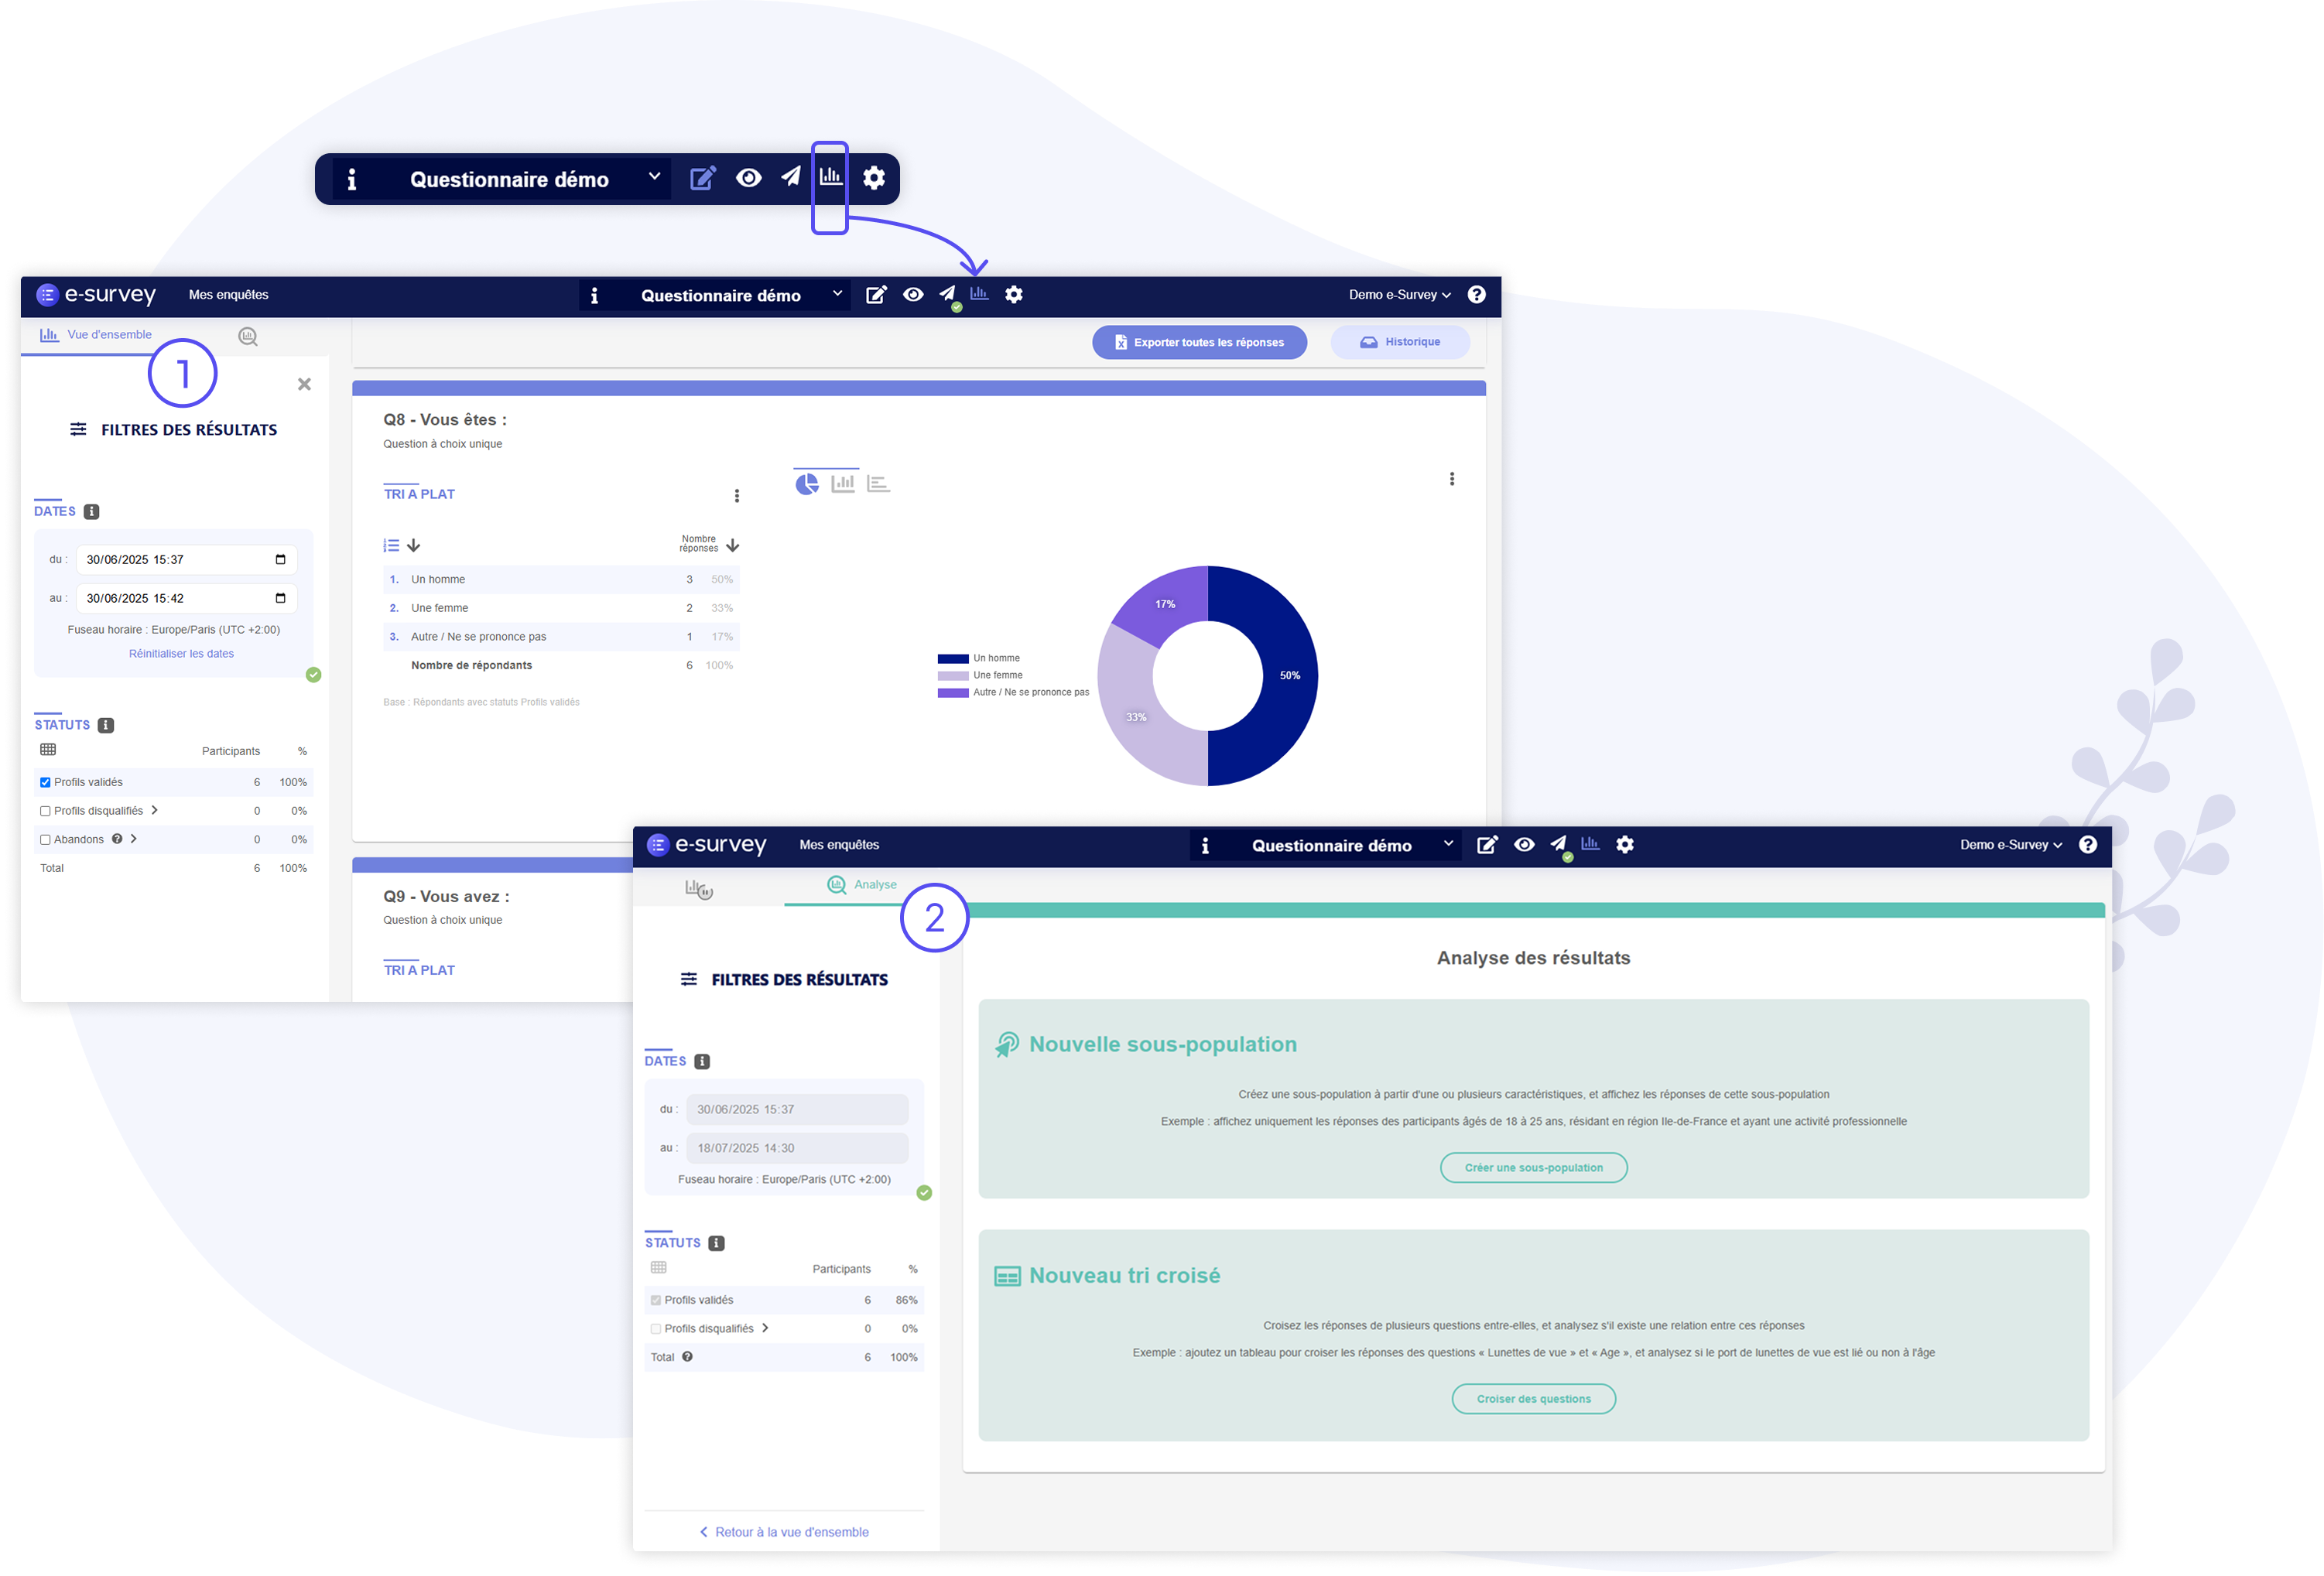
8 - Processing & Analyzing Results
Finally, during the collection of responses and/or after the survey is closed, you will be able to access the "Results" page to:
View complete results
In the "Overall view" tab (1), you can access tables
(Tabulated Data) and graphs for all questions (except for questions of the Free Response type - Text Fields,
Long Text, and Forms - for which responses are directly available in the Export). From this same tab, you will
also be able to monitor the progress of Quotas.
Export all responses
From the "Overall view" tab (1)), you can also export all survey
responses (to an Excel file) – See the complete tutorial on Response Export
Start analysis
From the "Results Analysis" tab (2) (or "Analysis"), you can
analyze survey results in greater depth using the available analysis tools:
- Analysis on Sub-populations - See the complete tutorial on Sub-populations
- Cross-sort Analysis - See the complete tutorial on Cross-Tabulations
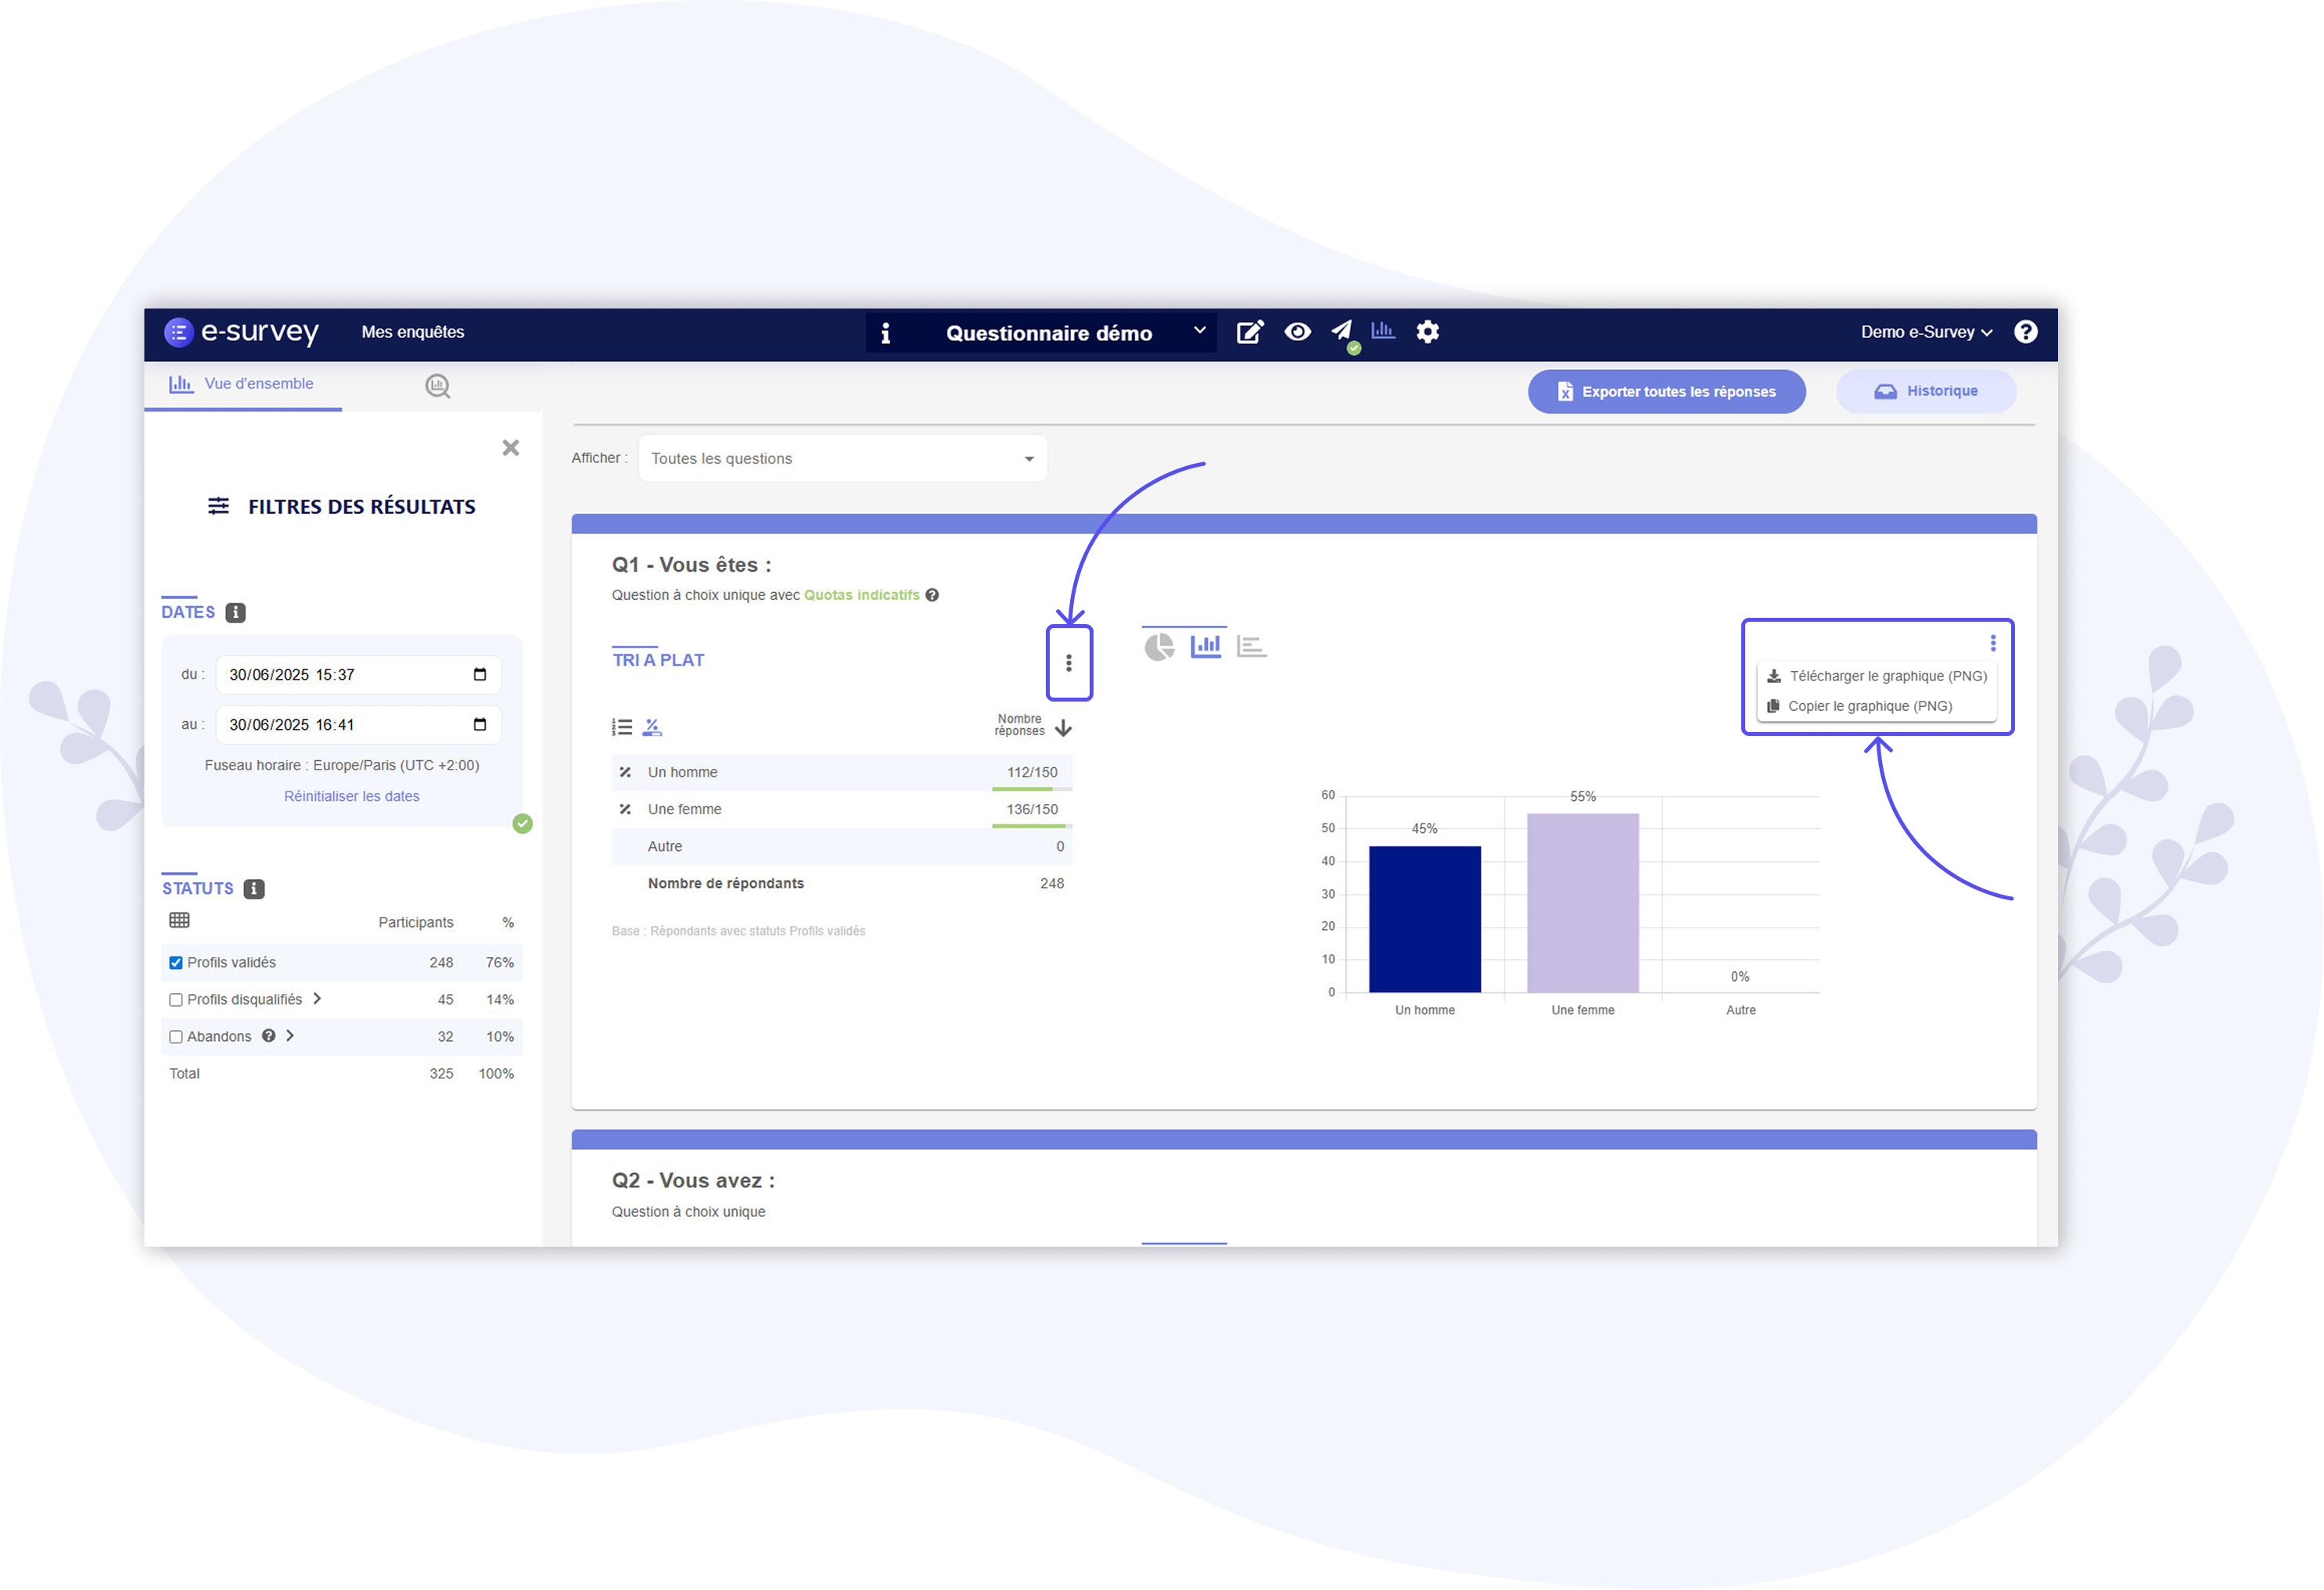
Note:
From the "Overall view" and "Analysis" tabs, you can download each results table (Tabulated Data and
Cross-tabs) in PNG format or copy/paste them directly into a Word or PowerPoint document, for example.